THE CAVENDER DIARY

2 GROWN MEN vs a 40 YEAR OLD HOUSE

  • Home
  • Who Are We?
  • House Tour
  • To Do List
  • Projects
  • Recipes
  • Did Ya Know?
  • Books
  • Our Press

Halloween on Cavender Street 2014

Posted by James on October 30, 2014
Posted in: New Home. Tagged: Halloween, Halloween Decorating, Halloween Lights, Halloween on Cavender. 20 Comments

Since our house tour for Christmas last year was such a hit….We thought we’d do the same thing for Halloween.

The Cavender House for October with Pumpkins in the Flower Beds

Halloween on Cavender Collage3

Pumpkins and Cacti in the Cavender Flower Bed

The Front Door of the Cavender House for October

Halloween on Cavender Collage2

Skull Doormat from Target

Halloween 2014 Collage

James and the Big Hammonds Lolly

Yummy S'Mores Inspired Ghost Brownies from the Cavender Diary boys

Halloween on Cavender 2014 Collage6

Bat Dish Filled with M&Ms

Halloween 2014 Collage 4

We just love the graphic orange of the pumpkins in the flower beds surrounded with green cacti and agave.

There are tutorials for the Square Leaf Wreath, The Autumn Leaf Garland, The Pumpkin Arrangement, and the Ghost Brownies.

HAPPY HALLOWEEN, Y’ALL

Share this:

  • Click to share on Facebook (Opens in new window) Facebook
  • Click to share on LinkedIn (Opens in new window) LinkedIn
  • Click to share on X (Opens in new window) X
  • Click to share on Pinterest (Opens in new window) Pinterest
Like Loading...

BEST EVER Halloween Mixtape

Posted by James on October 28, 2014
Posted in: New Home. Tagged: Halloween, Halloween Music, Halloween Party. 12 Comments

Halloween Mix Tape

I seriously hope y’all remember what a mix tape is. (I think it’s refered to as a “playlist” now)

Shifting through my Itunes, I pulled an eclectic mix of songs perfect for your festive Halloween mixer, or a night at home carving jack-o-lanterns with the kids:

Your choice.

Either way, enjoy.

Science Fiction Double Feature – Rocky Horror Picture Show
Werewolves of London – Warren Zevon
Monster Mash – Bobby “Boris” Pickett
Witchcraft – Book of Love
Who Can it Be Now – Men at Work
Sweet Dreams – Marilyn Manson
Frankenstein – The Edgar Winter Group
Black Magic Woman – Santana
Eaten by the Monster of Love – Sparks
That ol’ Black Magic – Louie Prima and Keely Smith
Dark Lady – Cher
Weird Science – Oingo Boingo
Witchcraft – Frank Sinatra
Riannia – Fleetwood Mac
Evil Woman – ELO
The Ghost in You – The Psychedelic Furs
Grave Digger – Dave Mathews Band
Don’t Fear the Reaper – Blue Oyster Cult
Hungry Like the Wolf – Duran Duran
Enter Sandman – Metallica
Somebody’s Watching Me – Rockwell
Crazy Train – Ozzy Ozbourne
I Put a Spell on You – Nina Simone
The Killing Moon – Echo and the Bunnymen
Psycho Killer – Talking Heads
Season of the Witch – Donovan
I’m Your Boogie Man – KC and the Sunshine Band
Superstition – Stevie Wonder
Dead Man’s Party – Oingo Boingo
Bad Things – Jace Everett
Pet Sematary – The Ramones
Little Red Riding Hood – Sam the Sham and the Pharos
Highway to Hell – ACDC
People are Strange – The Doors
Thriller – Michael Jackson

Any songs y’all think we left off (other than the obvious movie themes) we’d love to add them.

(If you know anyone else who would put Nina Simone right after Ozzy on a mix tape, I’d like to meet them)

Share this:

  • Click to share on Facebook (Opens in new window) Facebook
  • Click to share on LinkedIn (Opens in new window) LinkedIn
  • Click to share on X (Opens in new window) X
  • Click to share on Pinterest (Opens in new window) Pinterest
Like Loading...

For Your Halloween Viewing Pleasure

Posted by James on October 27, 2014
Posted in: Did Ya Know?, New Home. Tagged: Disney, Halloween, Silly Symphonies, Silly Symphony, Walt Disney. 4 Comments

We present to you: Walt Disney’s Silly Symphony – “The Skeleton Dance”.

In 1929 “The Skeleton Dance” was Walt Disney’s first in the Silly Symphony series. After executives at Columbia Pictures saw it they were determined to sign Disney and his Silly Symphonies to exclusive distribution. This contract only lasted 4 years, as Disney felt he was in direct competition with Columbia’s other animated star, Betty Boop. He was, she was much more popular that Mickey Mouse. The Silly Symphony animated shorts were a platform for Disney to experiment with processes, techniques, characters, and stories in order to further the art of animation. That proved crucial to Disney’s plan to create feature-length animated films. (Something that no one else at the time thought would be possible or even profitable)

He proved them wrong.

Over 10 years, Disney produced 75 Silly Symphonies, wining the Academy Award for Best Animated Short 7 times.

…….and I think he eventually produced a few successful feature-length animated movies as well.

Share this:

  • Click to share on Facebook (Opens in new window) Facebook
  • Click to share on LinkedIn (Opens in new window) LinkedIn
  • Click to share on X (Opens in new window) X
  • Click to share on Pinterest (Opens in new window) Pinterest
Like Loading...

Hide and Go “Peep”

Posted by James on October 25, 2014
Posted in: New Home, Recipes. Tagged: Ghost Peep, Ghost Peep Brownies, Ghost Peep Recipe, Ghost Peeps, Halloween, Halloween Brownies, Halloween Treats. 8 Comments

Everybody loves S’mores.

Why limit them just to summer campfires?

Try our Halloween brownie version……..staring Ghost Peeps. The only candy with a cult following.

For the Graham Cracker crust start with:

  • 1 Cup Crushed Graham Crackers
  • 1/4 Cup Brown Sugar
  • 4 TBS Melted Butter

Mix everything together and smash into the bottom of a 9X9 greased baking dish.

Pop it into a 375 degree oven for about 4 minutes to “crisp it up”.

Mash the Graham Cracker Crust into the Bottom of a 9X9 Baking Dish

Then mix a box of chocolate brownie mix according to the package directions and bake it on top of the graham cracker crust. (HINT: Instead of oil…use melted butter. You’ll thank me)

Betty Crocker Supreme Brownie Mix

Chill in the fridge overnight, then remove the single large brownie from the pan and spread a layer of chocolate icing across the top.

Spread a Thin Layer of Frosting Across the Chilled Brownies so the Ghosts Will Stick

Not too much. Just enough to hold the ghost Peeps in place.

Ohhh yeah, the Peeps.

Ghost Peeps

Use a sharp, wet knife to slice the ghosts apart…..and line the little guys across the frosted brownies. Pressing in gently.

Ghost Peep Collage

15 ghosts will line-up across a 9X9 brownie just perfectly.

Now the fun part.

PLAYING WITH FIRE!!!!!!!

I’ve had this hand-held kitchen torch for years. Not something I use that often.

A Handheld Kitchen Tourch is Key for Indoor S'Mores

I set it on the lowest flame setting a pass it around the edges of the marshmallow Peeps. Charing them just a little.

IMG_6974

It works best if the brownies are cut apart.

Also……. avoid the ghost faces. The heat melts their tiny little eyes.

Plater of Ghost Brownies from the Cavender Diary Boys

Ghost Brownies Ready for a Party from the Cavender Diary

Ghost Brownies from the Cavender Diary

Peeps never tasted so good…

Or RICH,

You’ll want a glass of milk with these..

And, as always, you’re welcome.

Share this:

  • Click to share on Facebook (Opens in new window) Facebook
  • Click to share on LinkedIn (Opens in new window) LinkedIn
  • Click to share on X (Opens in new window) X
  • Click to share on Pinterest (Opens in new window) Pinterest
Like Loading...

The Universal Monsters

Posted by James on October 22, 2014
Posted in: Did Ya Know?, New Home. Tagged: Bela Lugosi, Boris Karloff, Bride of Frankenstein, frankenstein, Lon Chaney, Lon Chaney Jr., the Wolfman, Universal Horror Movies. 2 Comments

Before Universal Studios began producing monster movies, we didn’t have those iconic images of creaking staircases, decrepid cobweb-filled mansions, spooky mists, or even mobs of angry villagers with torches and pitchforks.

But most importantly, we didn’t have the monsters.

Universal Studios Monsters

Well, we did……in our imaginations. But It was Universal Studios who put them on the big screen.

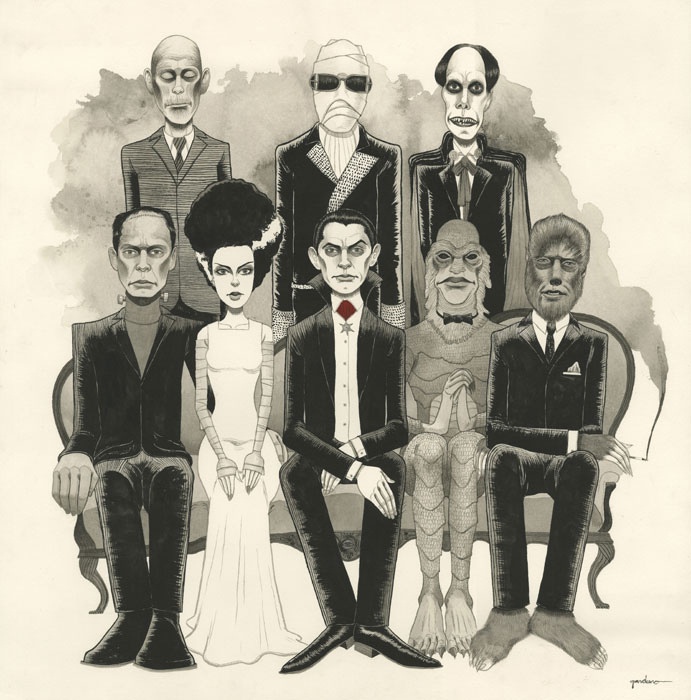
Universal lead the pack in producing scary movies from 1923 to about 1960; with the success of films like The Phantom of the Opera, Dracula, Frankenstein, The Bride of Frankenstein, The Mummy, The Invisible Man, The Wolf Man, and the Creature from the Black Lagoon. For about 40 years, movie-goers lined up to see how their favorite horror actors; Lon Chaney, Boris Karloff, Bela Lugosi and Lon Chaney Jr., would scare them next.

Lon Chaney As the Phantom of the Opera

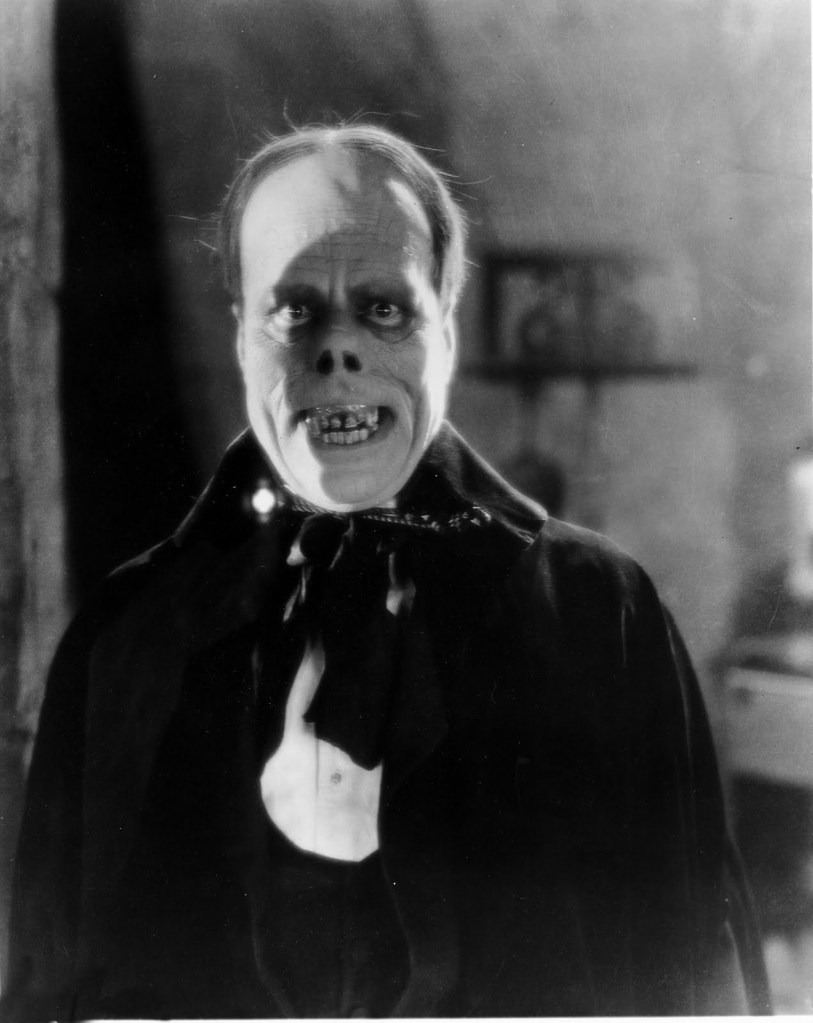
A tremendous success at the box office, Hunchback of Notre Dame inspired Universal to produce the studio’s first true horror film in 1925, The Phantom of the Opera, based on the mystery novel by Gaston Leroux. Lon Chaney designed and endured a torturous make-up regime that exceeded the demands of his previous role as the Hunchback. The highlight of the movie is when the timid Christine removes the phantom’s mask revealing the sunken-eyed monster underneath. Chaney left Universal and signed a contract with MGM, unfortunately dying before he could make any more monsters.

Boris Karlof as the Frankenstein Monster

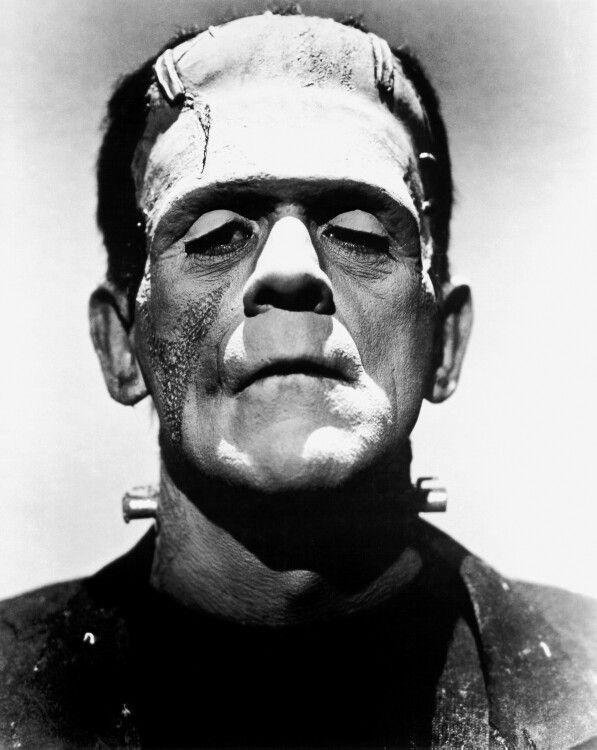
Frankenstein, (loosely based on the novel of the same name by Mary Shelly), was released on December 4, 1931 and grossed a whooping $53,000 in just one week. The most well-known image of Frankenstein’s monster in popular culture is derived from Boris Karloff’s portrayal in this movie. There are stories of audience members passing out in terror the minute he appears on screen. His makeup was created by movie-makeup legend Jack Pierce. It was Pierce who designed the iconic “flat head” for Karloff’s monster, although director James Wales tells a different story. There’s no musical soundtrack in the film, except for the opening and closing credits; adding to the “creepy” factor.

Frankenstein was a huge hit with both audiences and critics, the film was followed by multiple sequels and is still considered to be one of the best horror films in movie history.

Bela Lugosi as Dracula

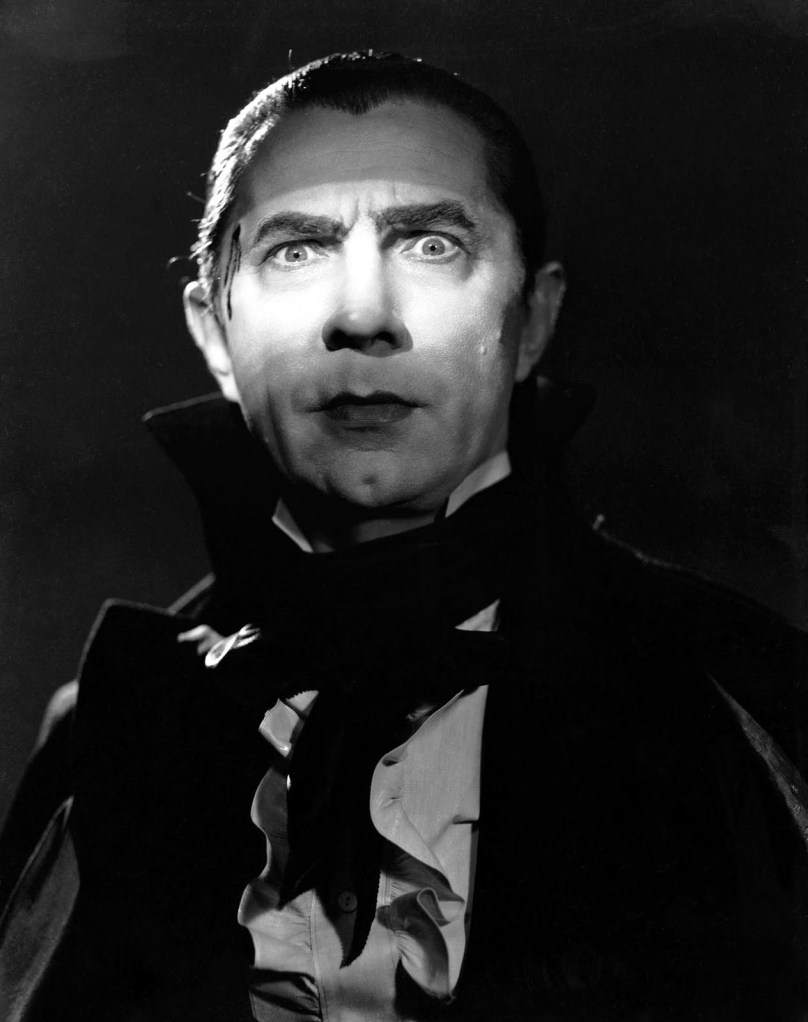
Bela Lugosi was performing as Dracula in the stage play of Bram Stoker’s gothic novel when Universal bought the rights for the film. Having been born in Transylvania, he was a natural choice for this 1931 talkie, although not the first. Director Tod Browning wanted his dear friend Lon Chaney for the part, despite the fact that Chaney had just signed with MGM at the time. Chaney’s death sealed Lugosi’s fate with his “signature” role….and the character he could never shake. There is no denying that Bela Lugosi will always be the true Dracula; handsome, mysterious and alluring,

……but he was forever typecast as the Count.

Elsa Lanchester as the Bride of Frankenstein

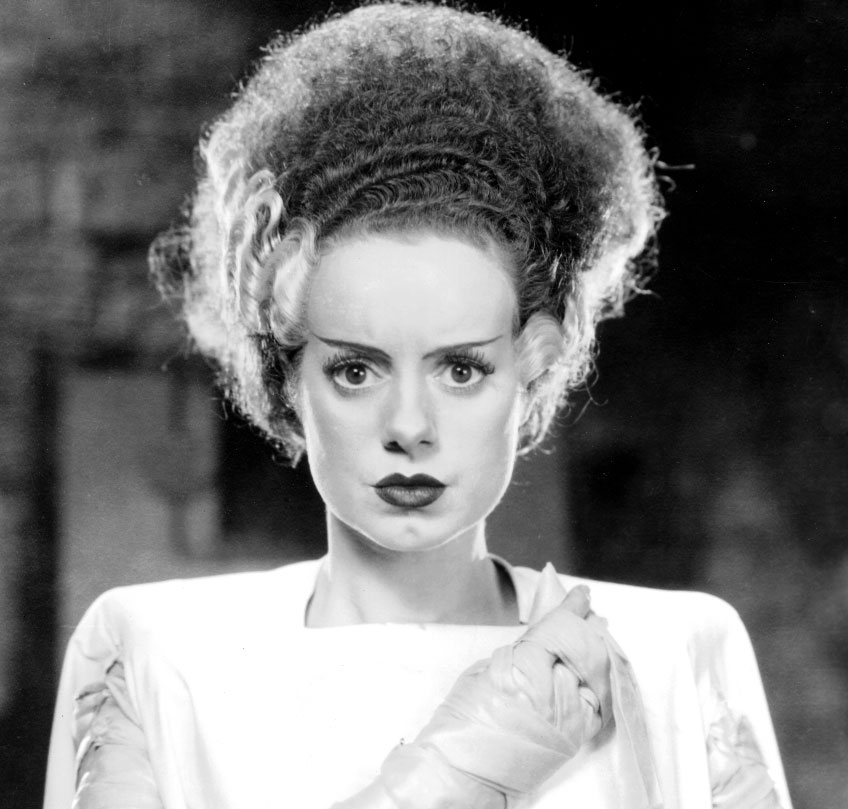
Originally titled The New Adventures of Frankenstein, The Bride of Frankenstein proved that resurrecting dead monsters would earn massive profits for Universal. Elsa Lanchester was a small actress at the time, and didn’t even get billing for the title role. The opening credits simply list The Monster’s Bride as played by “?”. But we all know it was Elsa; she also played Mary Shelly in the opening scene of the film. With a gravity-defying hair-do inspired by Nefertiti and a hiss she learned from swans, Elsa steals her scenes from the magnetic Karloff. Who, by the way, was forced to talk in this picture by the Universal studio heads…..so he only used 40 words.

The Bride of Frankenstein cost an astounding $8.5 million to produce (in modern figures, of course) and is considered by some to be one of those rare movie sequels that is actually better than the original.

Boris Karlof as the Mummy

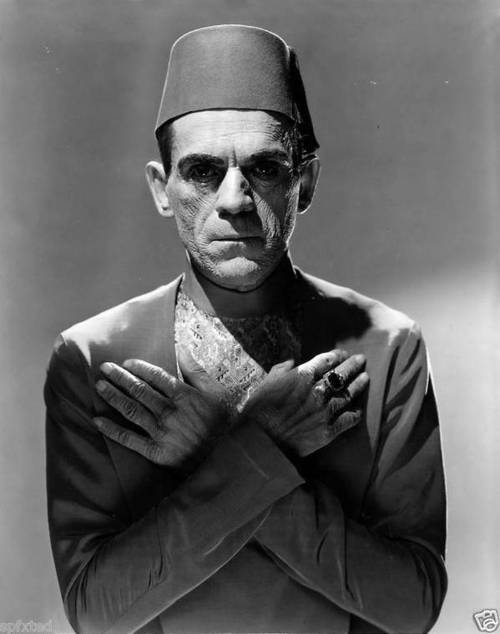
Billed only as “Karloff” for The Mummy, Boris Karloff’s make-up took make-up artist Jack Pierce, who else?, 8 hours to apply. Maybe that’s why the bandaged Karloff only has a few moments of memorable screen time. The rest of the film he appears in less elaborate make-up….and wearing a fez. There were no sequels for this thriller, but Universal did make several more “Mummy-themed” movies.

 None were as chilling as Karloff’s portrayal.

Claud Rains as the Invisible Man

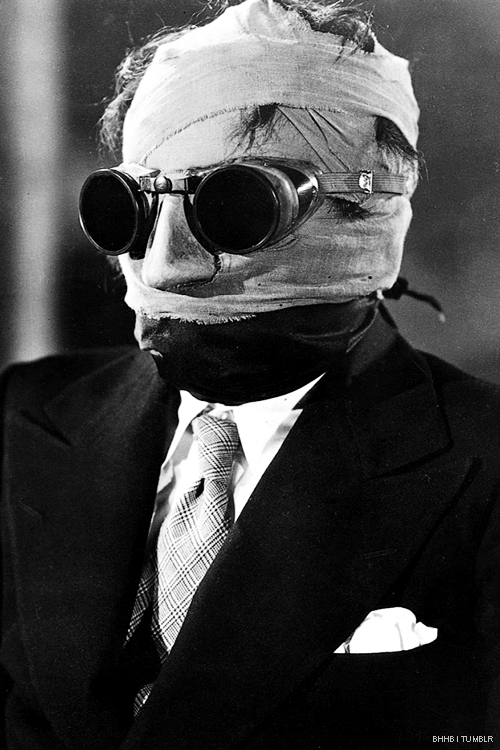
In 1933 The Invisible Man, also directed by James Whale, was Claude Raines first American screen performance. Well, sort of. He’s invisible, or covered in bandages and goggles through most of the movie. Audiences were wowed with the groundbreaking visual effects. Several tricks, like Raines undressing to reveal emptiness under his clothes, were shot with The actor covered in black velvet and filmed against a black velvet background, then overlapped with existing background footage. The results are still remarkable and have inspired generations of special effects artists. Writer H.G. Wells was never fond of this telling of his novel, but movie patrons were.

The Invisible Man was Universal Studio’s biggest hit since Frankenstein.

Lon Chaney Jr as the Wolfman

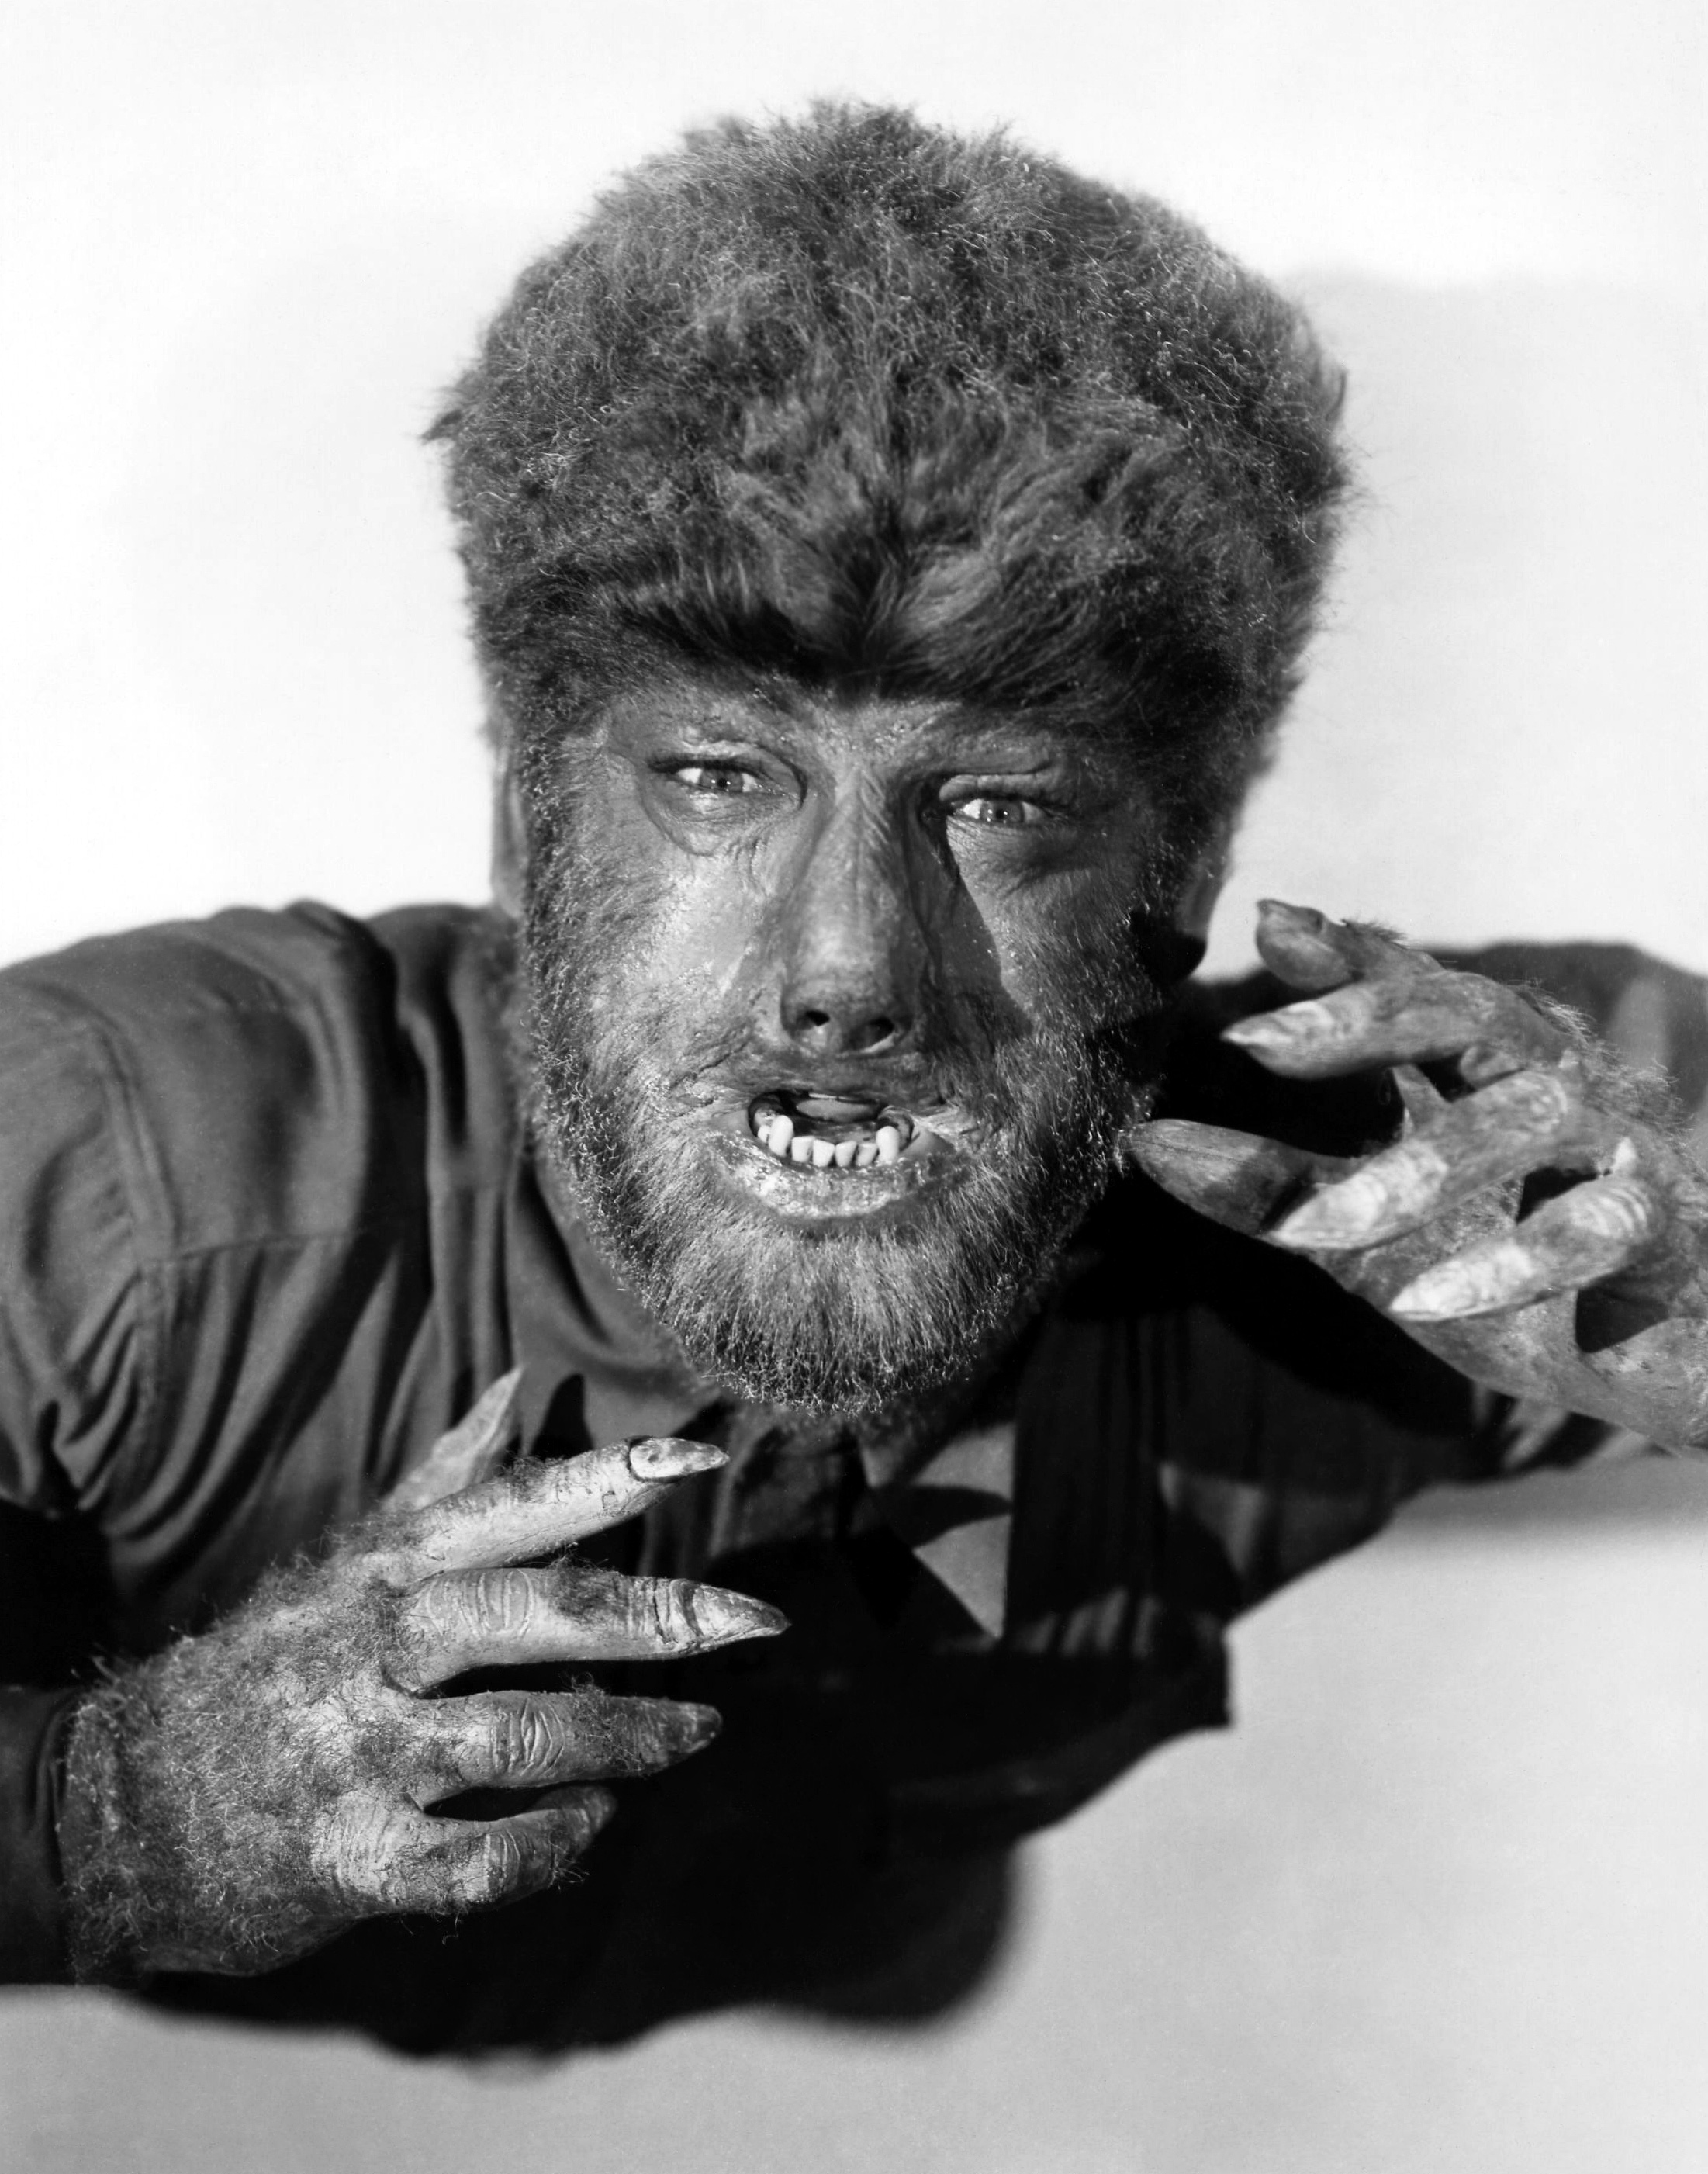
Lon Chaney Jr. has the honor of being the only Universal actor to reprise his character of The Wolfman in all of the 1940’s sequels. 4 in total………and a few “werewolf” themed ones as well. Unlike our modern myth, the wolfman in this movie doesn’t uncontrollably change in the light of a full moon, not until the sequel at least. Once again, make-up artist Jack Pierce hit one out of the park with latex and yak hair. The make-up sessions were grueling on Chaney Jr. but well worth it.

His wolfman is just as iconic of a monster as his father’s Phantom.

The Creature from Black Lagoon

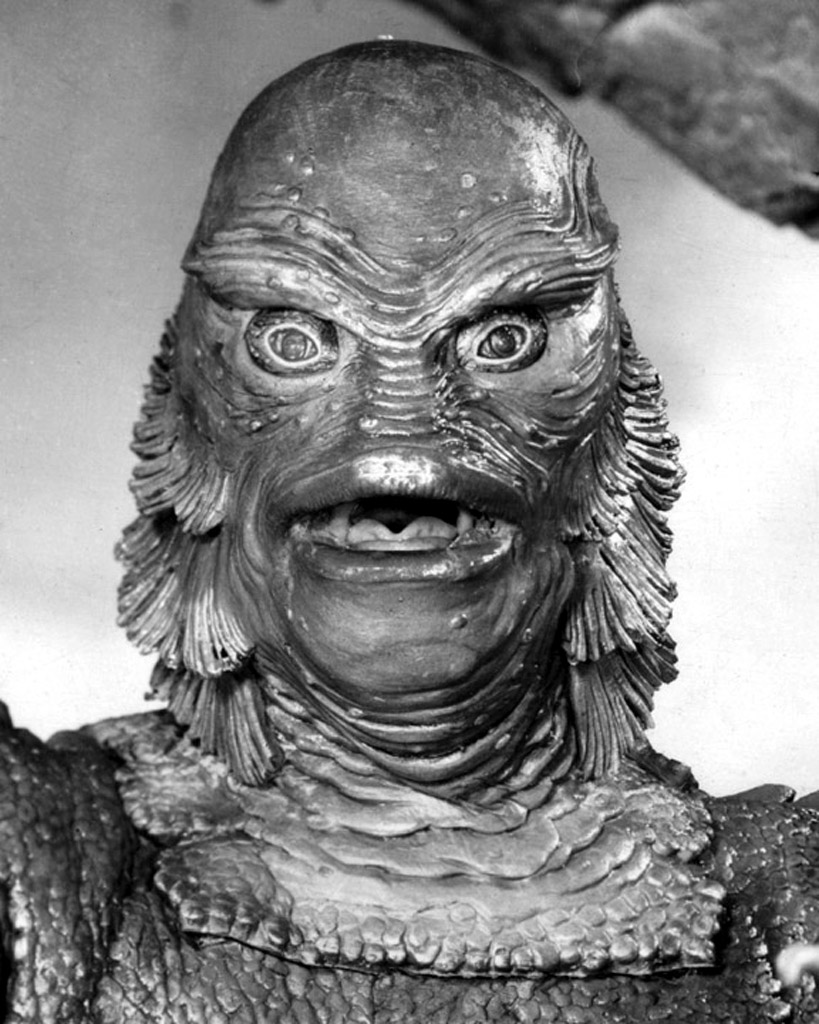
Universal’s last great horror film was 1953’s The Creature From the Black Lagoon.  Even though the 3-D fad was quickly fading by then, the movie was released in 3-D in major cities, and a “flat” version simultaneously released in more rural areas. Usually, the monster in this flick is refered to as “the creature from the black lagoon”, but his real name is the gill-man. You may remember that in The Seven Year Itch, Marilyn Monroe says that she feels sorry for the creature because, “He just wanted to be loved.”

And who couldn’t love all that latex? The Gill-Man is still inspiring monsters over 60 years later.

Y’all can thank Universal Studios for these monsters,

…….and the countless nightmares they’ve inspired.

Share this:

  • Click to share on Facebook (Opens in new window) Facebook
  • Click to share on LinkedIn (Opens in new window) LinkedIn
  • Click to share on X (Opens in new window) X
  • Click to share on Pinterest (Opens in new window) Pinterest
Like Loading...

Aging Wood With Steel Wool & Vinegar

Posted by James on October 19, 2014
Posted in: New Home, Projects. Tagged: Aging Wood With Vinegar, Plumbing Pipe Shelves. 16 Comments

Yeah, you can do that.

Old wood is awesome, but not so easy to find in the sizes I need.

Can be a little “pricey” too.

Here’s a quick trick to age new wood to look a little weathered……or a lot weathered.

How to Age wood with Steel Wool and Vinegar from the Cavender Diary

Shred a handful of steel wool and add it to a Mason jar of vinegar.

After a couple of days….It looks like this muck.

Lovely, right?

The Mucky Vinegar for Aging Wood

Use this to “paint” on wood.

As it dries, and the mixture soaks into the wood, the colors start to age.

Now, this is important. Different woods will react differently to the vinegar mixture.

Different Woods Take the Age Treatment Differently

Yeah, the cedar bled a little, but I think y’all get the idea.

I brushed it all over the pine shelves on my plumbing pipe fixture in the living room.

Here’s the before:

Looking Down on Our Plumbing Pipe Shelves

And after a coat of the vinegar mixture…..

Looking Down on Our Aged Plumbing Pipe Shelves

I’m not sure where the “pink” tones came from…but there they are.

I promise, it looks much more grey/brown after a few days of drying.

See?

Plumbing Pipe Shelves from the Cavender Diary

“How does the vinegar and steel wool make the wood change?” you may ask.

The only plausible answer is “Science”.

Science is why.

Use this knowledge only for good.

Share this:

  • Click to share on Facebook (Opens in new window) Facebook
  • Click to share on LinkedIn (Opens in new window) LinkedIn
  • Click to share on X (Opens in new window) X
  • Click to share on Pinterest (Opens in new window) Pinterest
Like Loading...

How to Build Plumbing Pipe Shelves

Posted by James on October 17, 2014
Posted in: New Home, Projects. Tagged: plumbing pipe, Plumbing Pipe Shelves. 128 Comments

This was bound to happen eventually.

How to Build Plumbing Pipe Shelves from the Cavender Diary

If you read any sort of “Home” blog in the internet………you’ve seen this a thousand times. Maybe more.

Time for us to catch up with everyone else.

The only wall in our living room has been begging for some shelves since the first time we stepped foot in the Cavender house.

Empty Wall in the Living Room for My Shelves

There were some “modernish” chrome/black glass ones there for a few years. Thought we could live with them, they were so cheap, but I just couldn’t any longer. Black Glass????

We’ve been using plumbing pipe for projects all over the house; like the Rolling Log Holder, our Vintage-Looking Dog Bed, and in the Garage for storage. We’re going to use even more in the closets and maybe even as a shower curtain rod. Stay Tuned

After much rooting around the Home Depot plumbing isle, here’s what we came up with to hold our 10 foot wooden shelves together.

Here are the Pieces I need for Each Shelf Support - Copy

Here’s a footing, completely screwed together….

All the Pipes Connected for my Plumbing Pipe Shelves

I spaced 4 of these babies across the wall and attaches the back flange to the wall with drywall screws.

I Set my Footings in Place and Attached Them to the Back Wall

Ignore the tall pipe on the left. I was just getting a feel for how tall I wanted it. 4 shelves including the top…..43 1/2 inches from the floor.

The wood shelves, almost the entire length of the wall, slide down on each pipe and rest on the “T” joint.

I use a 1 inch paddle bit to make 1 inch holes in my shelf boards for the 3/4 inch pipe. My pipes are set 30 inches apart, and 15 inches from each side of the end of the shelves.

Use a 1 Inch Paddle Bit to Make Holes for the Pipe

The boards rest perfectly on the “T’ connectors. 1 in the front and the second in the back

The Shelf Rests on Top of the 2 Ts

Lots and lots of measuring, but connecting the pipes and sliding on the wood shelves was a pretty easy process.

One shelf at a time, and attaching each back flange to the wall with drywall screws.

Looking good so far.

Side View of the Plumbing Pipe Self Unit

The final posts are topped with flanges just like the feet.

I carefully measured so that each one is exactly 42 1/2 inches from the floor. They easily twist to adjust the height.

My Flange Heigth is Exactly 42 and half Inches Tall

…and 14 1/2 inches from the back wall.

My Flange is Exactly 14 and a half Inches Away From the Wall

I leveled a 10 foot “cleat”, made from a 1X4, across the back wall……again, I attached it with drywall screws.

The Shelves with the Cleat Added to the Back Wall

……with 1X4 inch notches cut out and lined up perfectly with my flanges.(See where this is headed yet?)

I Knotch Out My Cleat for the Supports

14 1/2 inch supports, cut from a pine 1X4, fit in these notches and rest on the flanges in front.

Like so…..

My Support Piece Fits in the Knotch and Rests on the Flange

And the top boards sit on the supports.

The Cap Shelf Rests Perfectly on top of the Brace

A 1X2 trim piece hides all the ugly and makes my cap shelf look more substantial.

Looking Down on Our Plumbing Pipe Shelves

I didn’t want to stain my shelves, so I aged them a little with a mixture of steel wool and vinegar….(More on that to come later)

…..and then filled them with crap. Like so…..

Our Finished Plumbing Pipe Shelves in the Living Room

The Top of Our Plumbing Pipe Shelves

Books on the Plumbing Pipe Shelves in the Cavender Living Room

Plumbing Pipe Shelves from the Cavender Diary

Good place to fit the overflow of books from the den.

I’ve been collecting the vintage locker baskets to use in the closets someday. (big sigh) But for now, they hold paperbacks and CDs. Yepp, we still own CDs.

But who’s even going to notice what’s in the baskets……

…… when the shelves are so freakin’ cool?

Share this:

  • Click to share on Facebook (Opens in new window) Facebook
  • Click to share on LinkedIn (Opens in new window) LinkedIn
  • Click to share on X (Opens in new window) X
  • Click to share on Pinterest (Opens in new window) Pinterest
Like Loading...

I Don’t Design Clothes

Posted by James on October 14, 2014
Posted in: New Home. Tagged: Ralph Lauren Birthday, Ralph Lauren I Don't Design Clothes. 5 Comments

"I Don't Design Clothes, I Design Dreams" - Ralph Lauren

Share this:

  • Click to share on Facebook (Opens in new window) Facebook
  • Click to share on LinkedIn (Opens in new window) LinkedIn
  • Click to share on X (Opens in new window) X
  • Click to share on Pinterest (Opens in new window) Pinterest
Like Loading...

Pulp Novel Art

Posted by James on October 12, 2014
Posted in: Did Ya Know?, New Home. Tagged: Pulp Fiction, Pulp Fiction Art. 2 Comments

Pulp magazines are inexpensive fiction magazines published from the late 1800’s through the 1950’s.

Printed on cheap paper, the typical pulp magazine was about 7 inches by 10 inches and 128 pages long……just the right size to fit in a pocket. Because they were published so cheaply, pulps usually had ragged, untrimmed edges. There was little advertising for these cheap reads, so the cover had to do all the attention grabbing. They were most often covered in scantily clad vixens with gravity defying blossoms.

Master of Men the Spider Pulp Novel

Phantom Detective Pulp Novel

Dime Mystery Magazine Pulp Novel

Rodent Mutation Pulp Novel

Satan was a Lesbian Pulp Novel

Spicy Mystery The Cat Tastes Blood Pulp Novel

Terror Tales Corpse Wedding Night Pulp Novel

The Chinese Parrot Pulp Novel

The SHadow Magazine Pulp Novel

Thrilling Mystery Pulp Novel

Bats Out of Hell Pulp Novel

Spicy Mystery Stories

As y’all can see here, even the horror stories benefited from the lure of the fairer sex.

Share this:

  • Click to share on Facebook (Opens in new window) Facebook
  • Click to share on LinkedIn (Opens in new window) LinkedIn
  • Click to share on X (Opens in new window) X
  • Click to share on Pinterest (Opens in new window) Pinterest
Like Loading...

It Begins With a Perfect Pumpkin

Posted by James on October 8, 2014
Posted in: New Home, Projects. Tagged: Flowers in a Pumpkin, Halloween, Halloween Flowers, Pumpkin Arrangement. 18 Comments

Like this beauty right here, from the grocery store…..Can you believe it?

Our Perfect Pumpkin for a Flower Arrangement

Isn’t it just a stunner?

$4.99, (with my reward card….of course)

You should see how long it takes me to pick out a pumpkin.

Since this ones is wayyyyyy too pretty to just carve into a Jack-O-Lantern……..I’m gunna fill this thing with flowers.

Pumpkins are great for making lanters…….not so much for holding water.

After rooting around store for water-holding options, we found this trick-or-treat bucket in the candy isle for 99 cents.

Halloween Trick-or-Treat Bucket

It’s just the perfect size to fit inside my pumpkin.

I flip it upside down and use it as a template.

Use the Buckt as a Template for Cutting

Marking my line for cutting with a sharpie.

Use a Sharpie to Make a Cutting Line

Not sure if y’all know this or not, but always carve a pumpkin with a serrated knife. It makes a world of carving difference.

A Serated Bread Knife Works Best for Carving a Pumpkin

After scooping all the innards out, (I’ll save those seeds to roast later) I’m left with a perfect hole in my pumpkin for the plastic bucket.

Beautifully Hollowed Out Pumpkin

Here’s a little-known florist’s trick.

Use a piece of chicken wire as a guide for holding all your flowers in place.

Just crunch it a little……

Chciken Wire is the Trick Florists Use for Arrangements

……. and shove it inside the bucket.

The Pumpkin with a Bucket and Chicken Wire

Then fill ‘er up with water.

For flowers…….sure, I can go to the wholesaler. But wholesalers only sell in bulk. I don’t need 24 roses, and a dozen for 10 bucks is a pretty good deal.

Here’s what 26 bucks got me at our local grocery store.

Fresh Flowers from the Local Grocery Store Soaking up Water

I went with a mixture of colors and textures. You’re probably thinking, “Why not all orange flowers for Halloween?”

What could be more boring. My pumpkin is orange, and I want my flowers to really stand out….not blend in.

Start any arrangement with the largest flowers, like these white mini hydrangea.

I start with Hydrangea

They’ll make a good base for holding the other flowers in place.

OOOOhhhh, be sure to always cut your flowers at an angle so they can soak up as much water as possible. Especially hydrangea.

Always Cut Fresh Flowers at an Angle with Sharp Clippers

My roses really opened up overnight.

(I remove all the floral packaging and give everything a fresh cut. Then fill a bucket with cool water and let the flowers soak it up for at least a day before doing an arrangement.)

I add the “Conga” roses in small groups.

The Roses are Second

These orange spray roses will fill in any holes.

Use the Spray Roses to Fill in the Holes

The last thing I add is the goldenrod. Usually bright yellow, pretty sure this has been dyed orange……and I like that.

Lastly I add Goldenrod as a Filler

That’s about all there is to this….

Arrangement in a Pumpkin by the Cavender Diary Boys

Close Up of the Pumpkin Arrangement from the Cavender Diary

Arrangement in a Simple Store-Bought Pumpkin

Pretty stunning for a 32 dollar investment.

(from our humble, neighborhood grocery store)

Share this:

  • Click to share on Facebook (Opens in new window) Facebook
  • Click to share on LinkedIn (Opens in new window) LinkedIn
  • Click to share on X (Opens in new window) X
  • Click to share on Pinterest (Opens in new window) Pinterest
Like Loading...

Posts navigation

← Older Entries
Newer Entries →
  • The Cavender Boys

  • Buy My Book

    Check out the link below to get your copy of "DIY Industrial Pipe Furniture & Decor" by James Angus

    https://amzn.com/1612436064

  • Tags

    American Flag Apartment Therapy arts Backyard Bathroom Remodeling Beacon Blanket Big Tex Black Spray Paint Bloggers Can Lights Cedar Walls Christmas Christmas Decorating Christmas Ornaments Christmas Tree Crazy Mouse Ride Den Diane Keaton diy Doberman Earth Grout Edward Curtis Electrical Work Fletcher's Corny Dogs flower beds Frankoma pottery Front Yard Garage Garage Update Halloween Halloween Decorating happy halloween harley Harley Davidson home House Tour Houzz hudson bay blankets Ikea Ikea Borrby Lantern illustration july 4th Key West Trip Kitchen Remodel Living Room mantle Master Bathroom Master Bathroom Remodel Master Bedroom mercury ornaments merry christmas Modern Horizontal Fence Motherhood Paint Colors plumbing pipe Projects Ralph Lauren restoration hardware Russet Stain Shiny Brite Ornaments state fair of texas style Swiss Army Blanket Target technology Texas State Fair thanksgiving Thrift store Tile Backsplash travel vacation Vintage chair vintage christmas vintage ornaments Wood Wall
  • Recent Posts

    • Vacation ’24
    • Happy Halloween
    • Planes, Trains & the Occasional Uber
    • Family Secrets
    • Capitol T, and that Rhymes with P
  • Archives

    • June 2024
    • October 2023
    • June 2023
    • April 2023
    • July 2022
    • December 2021
    • July 2021
    • December 2020
    • October 2020
    • September 2020
    • August 2020
    • July 2020
    • June 2020
    • May 2020
    • April 2020
    • March 2020
    • February 2020
    • January 2020
    • December 2019
    • October 2019
    • April 2019
    • January 2019
    • December 2018
    • November 2018
    • October 2018
    • September 2018
    • June 2018
    • May 2018
    • April 2018
    • March 2018
    • January 2018
    • December 2017
    • October 2017
    • September 2017
    • August 2017
    • July 2017
    • June 2017
    • May 2017
    • April 2017
    • March 2017
    • February 2017
    • January 2017
    • December 2016
    • November 2016
    • October 2016
    • September 2016
    • August 2016
    • July 2016
    • June 2016
    • May 2016
    • April 2016
    • March 2016
    • February 2016
    • January 2016
    • December 2015
    • November 2015
    • October 2015
    • September 2015
    • August 2015
    • July 2015
    • June 2015
    • May 2015
    • April 2015
    • March 2015
    • February 2015
    • January 2015
    • December 2014
    • November 2014
    • October 2014
    • September 2014
    • August 2014
    • July 2014
    • June 2014
    • May 2014
    • April 2014
    • March 2014
    • February 2014
    • January 2014
    • December 2013
    • November 2013
    • October 2013
    • September 2013
    • August 2013
    • July 2013
    • June 2013
    • May 2013
    • April 2013
    • March 2013
    • February 2013
    • January 2013
    • December 2012
    • November 2012
    • October 2012
    • September 2012
    • August 2012
    • July 2012
    • June 2012
    • May 2012
    • April 2012
    • March 2012
    • February 2012
    • January 2012
    • December 2011
    • November 2011
    • October 2011
    • September 2011
    • August 2011
    • July 2011
    • June 2011
    • May 2011
    • April 2011
    • March 2011
    • February 2011
    • January 2011
    • November 2010
    • August 2010
    • June 2010
    • May 2010
    • April 2010
    • March 2010
    • February 2010
  • Enter your email address to follow this blog and receive notifications of new posts by email.

    Join 2,158 other subscribers
  • @CavenderDiary

    Tweets by CavenderDiary
  • The Cavender Diary

    The Cavender Diary
  • The Cavender Diary

    • RSS - Posts
    • RSS - Comments
  • Blogs Worth Watchin'

    • An Urban Cottage
    • Apartment Therapy
    • Beard and Pigtails
    • Brooklyn Limestone
    • Burlap & Denim
    • Camp Wandawega
    • Color Outside the Lines
    • Decorpad
    • Decorum DIYer
    • Den & Delve
    • Design Hazards
    • Domestic Daddy
    • Domestic Imperfection
    • Eclectically Vintage
    • Emily Henderson
    • Fourth Floor Walkup
    • Funky Junk Interiors
    • Handmade America
    • Heather Bullard
    • Houzz
    • I Heart Organizing
    • Japanese Trash
    • kara pasley designs
    • Manhattan-Nest
    • Merrypad
    • Nine Red
    • Our Humble Abode
    • Our Vintage Home Love
    • Pure Style Home
    • Red Bird Vintage Home
    • Roger & Chris
    • Sweetsuite
    • Tara Bradford Photography
    • The Brick House
    • The Inspired Room
    • The Lettered Cottage
    • The Recipe Grinder
    • Today's Nest
    • Vintage Revivals
    • West Eastern
    • Yellow Brick Home
    • Young House Love
  • Steal Our Style

    • American Photo Archive
    • Art's Not Dead
    • Barn Light Electric
    • Bauer Pottery
    • CB2
    • Decades Home
    • Design Within Reach
    • El Paso Saddle Blankets
    • Fiestaware
    • Jonathan Adler
    • Just Modern Decor
    • Lucky Stars Ranch
    • Pendleton
    • Pottery Barn
    • Ralph Lauren Home
    • Ranger Doug
    • Restoration Hardware
    • School House Electric & Supply Co.
    • Sonic Editions
    • The Curiosity Shoppe
    • The Land of Nod
    • Urban Outfitters
    • West Elm
    • Wisteria
Blog at WordPress.com.
THE CAVENDER DIARY
Blog at WordPress.com.
  • Subscribe Subscribed
    • THE CAVENDER DIARY
    • Join 1,063 other subscribers
    • Already have a WordPress.com account? Log in now.
    • THE CAVENDER DIARY
    • Subscribe Subscribed
    • Sign up
    • Log in
    • Report this content
    • View site in Reader
    • Manage subscriptions
    • Collapse this bar
 

Loading Comments...
 

    %d