THE CAVENDER DIARY

2 GROWN MEN vs a 40 YEAR OLD HOUSE

  • Home
  • Who Are We?
  • House Tour
  • To Do List
  • Projects
  • Recipes
  • Did Ya Know?
  • Books
  • Our Press

Workspace Perfected

Posted by James on May 30, 2013
Posted in: New Home. Tagged: Modern Workshed. 4 Comments

I’m so in love with this shed it isn’t even funny.

Too bad that we don’t have the yard space for one.

Designed by M. Valdes Architects for the Family Handyman Magazine July 2007 issue. The firm’s goal was to create a well-designed, carefully detailed suburban backyard shed that could be constructed using off-the-shelf materials from a builder supply store. In order to reach a broad audience the budget was kept to a minimum.  All the details of the design were developed focusing on simple, easy to communicate fabrication tasks by an amateur builder. In most cases materials were used in their original dimensions to avoid extra cuts. How brilliant is that?

Modern Workshed

Modern Workshed 2

The interior looks a little lacking, but after all, it is a work shed.

Modern Workshed Interior

The corrugated sheet metal roof was built at a pitch to deflect rain to the back of the shed.

The plexi-glass transoms across the front, but tapering towards the back, allow as much natural light as possible into the space.

Modern Workshed Roof Line

Modern Workshed at Night

Modern Workshed Blue Print

I’m filing this projet under “Our Next House Will Have a Bigger Yard”

Not that we plan on ever moving again.

But just in case……

Share this:

  • Share on Facebook (Opens in new window) Facebook
  • Share on LinkedIn (Opens in new window) LinkedIn
  • Share on X (Opens in new window) X
  • Share on Pinterest (Opens in new window) Pinterest
Like Loading...

Look What I Found

Posted by James on May 29, 2013
Posted in: New Home. Tagged: Dumpster Diving, Sculling Oar. 9 Comments

Dumpster diving again? Me?

It’s sad to see a store close, but the upside is that they purge.

Yeah for other people purging!

Whilst taking the trash out the other day in a shopping center, I found this long piece of loveliness in/next to the dumpster. Pro’lly because there is a “shark bite” taken out of the corner…….but I can work with that.

12 Foot Oar

For reference sake, I am 6’2″. So this baby (a sculling oar, btw) is over 12 feet tall. Had to tie the bitch on top of my Jeep.

“Just what the ‘H. E. double hockey sticks’ do you need that for?”, you or Jamie might possibly ask…….or even scream in disgust.

No idea what-so-ever……just, yet.

But it’s Mine, all Mine.

Please don’t call Hoarders.

Share this:

  • Share on Facebook (Opens in new window) Facebook
  • Share on LinkedIn (Opens in new window) LinkedIn
  • Share on X (Opens in new window) X
  • Share on Pinterest (Opens in new window) Pinterest
Like Loading...

An Experiment in Cactus

Posted by James on May 27, 2013
Posted in: New Home. Tagged: cactus, Growing Cactus. 4 Comments

Cactus – or is it cacti? Both sound correct – are pretty easy to grow.

Honestly, they just want to be left alone. No water, no fertilizer, nothing.

They almost thrive on the neglect.

This is the vision we have for our front of the house flower beds someday.

Courtyard filled With Paddle Cactus

(photo via ASLA)

I  love how lush and overflowing all the paddle cacti look. Especially when they are mixed in with the flowers, grasses and pea gravel.

Apparently this takes time….and of course money. Neither of which we have to spare.

But we may have found a cost-effective solution.

A neighbor of ours hacked down a huge prickly pear from his back yard with a machete recently and left the carcus in a pile in front of his house. We’ve never tried it before, but it has been said that cacti are very easy to propagate.

“What the hell?” They are free, “Let’s stick them in the ground a see what happens”

Here’s the salvageable assortment we dug from the trash heap.

Prickly Pear Cactus rescued from the Trash Pile

They have plenty of new growth already.

Close up of New Paddles

Even a few yellow flower buds.

So, we just stuck them in the flower bed. It was that simple.

Large Prickly Pear in the Ground

I tried to make them look bushy by planting the tallest in the back and the shorter pieces toward the front.

Looks pretty good so far.

A few weeks ago, while visiting the Peck family’s newest member, I noticed how huge the bunny ear cactus was in front of their house.

“Take some of it,” Gert offered.

…….and we did.

Jamie stuck the littlest pieces in white pots.

Look at all the new paddle buds……AND flowers.

Pots with Bunny Ear Cactus Pieces

And I shoved 2 bigger pieces into the ground, propped up on a rock.

Transplanted Bunny Ear Cactus Resting on a Rock

So far, everything is thriving.

Who knew that it was this easy?

…and free?

These things are just growing on the side of the road.

We’ll keep y’all posted on the progress.

Share this:

  • Share on Facebook (Opens in new window) Facebook
  • Share on LinkedIn (Opens in new window) LinkedIn
  • Share on X (Opens in new window) X
  • Share on Pinterest (Opens in new window) Pinterest
Like Loading...

Pottery Barn “Inspired” Easel

Posted by James on May 25, 2013
Posted in: New Home, Projects. Tagged: diy, Pottery Barn Easel. 14 Comments

Years ago, Pottery Barn sold something useful.

A 2 foot tall table-top easel that was perfect for every room of our house. But they offer them no more. I have been looking on eBay and Craig’s List for years, and haven’t found anything even close.

So I took matters into my own tentacles and just made one. What the Hell? I have Man-tools (a chop saw and a brad nailer)…and I’m clever.

I started with a small pile of poplar and cut all my components.

A spine, a base with 2 feet, and a shelf with a lip….pretty simple.

Precut Labled pieces for my Easel

All of my wood is 3/4 inch thick except for the Lip, it’s only 1/4 inch thick. The Spine and Base pieces are about 1 1/2 inches wide and the 2 feet are 2 inches wide. OOOh yeah, the shelf is 3 1/2 wide.

Precut pieces for my Easel with Legnths

I used Gorilla Wood Glue to attach the small 3″ spine piece to the bottom of my 26 1/2″ spine and clamped them untill they were dry.

About an hour.

Glue and Clamp the small piece to the Spine

I assume that I could have skiped the brads and glued all my pieces together, but the clamping and waiting will take forever. It’s faster to shoot a few brads.

I then assembled my base and feet.

Stacked the base pieces and nailed/glued the feet long ways underneath….shooting a couple 2 inch brads through all 3….and leaving a 1 1/4″ gap between the 5″ base pieces.

Glue and Nail the Feet to the bottom

Trimmed the bottom of my newly glued together spine with a chop saw at a slight 5 degree angle. Just enough to make my shelf pitch back.

5 degree Angle to the Spine

Then I slipped the complete spine into the open space in my base….and shot a brad through the bottom to hold it in place.

Insert the Spine into the Footings

Nailed and glued the front lip onto my shelf piece.

Glue and Nail the lip to the shelf

The shelf sits centered right on top of the 3 inch spine piece.

……and another brad to hold it in place.

Nail the Shelf on top of the Lift

Lastly, I glued and clamped the final piece of my spine on top of the shelf.

Clamp and Glue the Last Piece to the Spine

While the glue dried, I filled all my brad holes with natural wood filler.

Fill all the holes with Wood Putty

Once the spine was dried, about an hour, I used the chop saw to trim the top to a 5 degree angle…to match the pitch at the bottom.

Cut the top of the Spine to a 5 Degree Angle

I gave a light sanding to all my edges, nothing too precise….it doesn’t have to be perfect.

The whole thing got a coat of flat black latex paint. No surprises there……but I think I could have stained the poplar pretty easily. Or even just a coat of shiny polyurethane.

Paint Entire Piece with Flat Black Paint

These were so easy that I wiped out 3 at once. (Made it real easy to photograph the different steps…you thought I was only making one, didn’t you?)

Finished Easels with Paint Drying

Gave myself a BIG OL’ pat on the back for these.

Finished Pottery Barn Table Top Easel

Close Up of Base of Table Top Easel

Side View of Finished Pottery Barn Table Top Easel

They were so much easier that I expected………and pretty cheap; maybe 25 bucks for 3.

Already plan to make a few smaller, shorter ones.

I’ll keep y’all posted on the dimensions when I do.

Share this:

  • Share on Facebook (Opens in new window) Facebook
  • Share on LinkedIn (Opens in new window) LinkedIn
  • Share on X (Opens in new window) X
  • Share on Pinterest (Opens in new window) Pinterest
Like Loading...

American Road Trip

Posted by James on May 22, 2013
Posted in: New Home. Tagged: Road Trip. 9 Comments

If you aren’t familiar yet, allow me to introduce y’all to the tradition of the American summer road trip.

Found some web images that convey that spirit just perfectly,

Enjoy.

Hilfiger Road Trip

american-road-trip

??????????????????????????????????

EASYRIDER-SPTI-14.tif

road-trip-1

????????????????????????????????????????

Yellowstone National Park with the Boys

Mt. Rushmore from Jamie's Phone

Road Trippin Couple

Junction 359 New Mexico

Road Trip through South Dakota

CT  talk-family-truckster-0207-aj

?????????????????????????????????????????????????????????

road_trip_essentials

road-trip1

American Rockwell-esq Roadtrip

Open Strech of Highway into Blue Sky

richard-griot_suburban_road-trip_family

Route 66 Motel Vacancy

Joshua Trees


Share this:

  • Share on Facebook (Opens in new window) Facebook
  • Share on LinkedIn (Opens in new window) LinkedIn
  • Share on X (Opens in new window) X
  • Share on Pinterest (Opens in new window) Pinterest
Like Loading...

Creek Bed Party or Upscale Tailgate?

Posted by James on May 20, 2013
Posted in: New Home. Tagged: Creek Bed PArty, fraternity brother, Lambda CHi Alpha Crest, lambda chi alpha fraternity, Navy Blue Blazer, west texas dust. 8 Comments

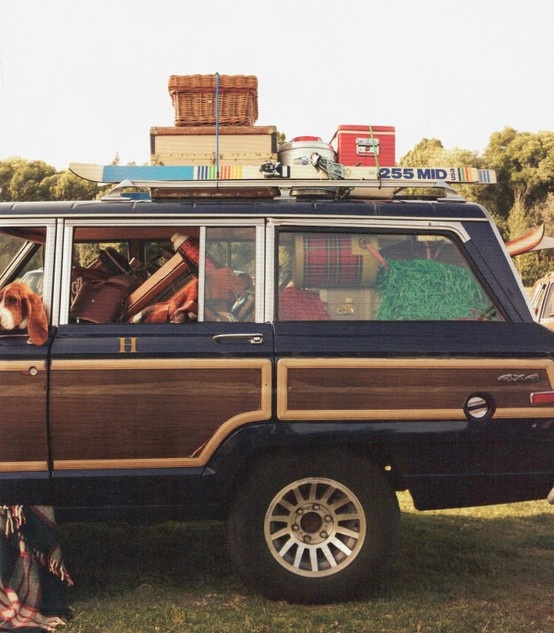
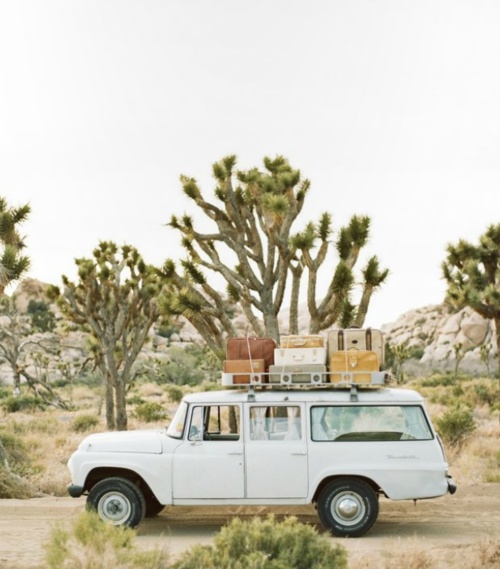
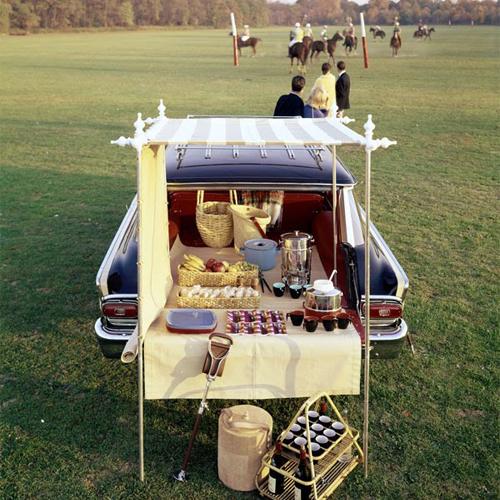
I found this picture on Pinterest recently, and it reminded me of my own attempt at a tailgate party.

Many, many years ago.

Vintage Polo Match Tailgate Party

I joined the Lambda Chi Alpha fraternity my first week at Texas Tech University. For those of you not familiar, Texas Tech is in Lubbock Texas. About 250 miles from water, trees, green grass, a Bennigan’s…….anything really. It’s an island surrounded by flat barren dry Texas landscape.

For some unknown reason, I was handed the reigns of organizing the chapter’s annual drunken booze-fest in the middle of a West Texas field…..that the brothers lovingly called “Creek Bed”. It was a 2 hour drive through the West Texas dust until “The 7 Sentinels” (they were trees. The only 7 trees for miles) and then a turn down another road of nothingness, untill you see an even smaller dirt road. At the end of the last dirt road/cattle path was it…Creek Bed. The perfect place to drink, pee, possibly puke, eventually pass out, and wake up in the desert. What joy.

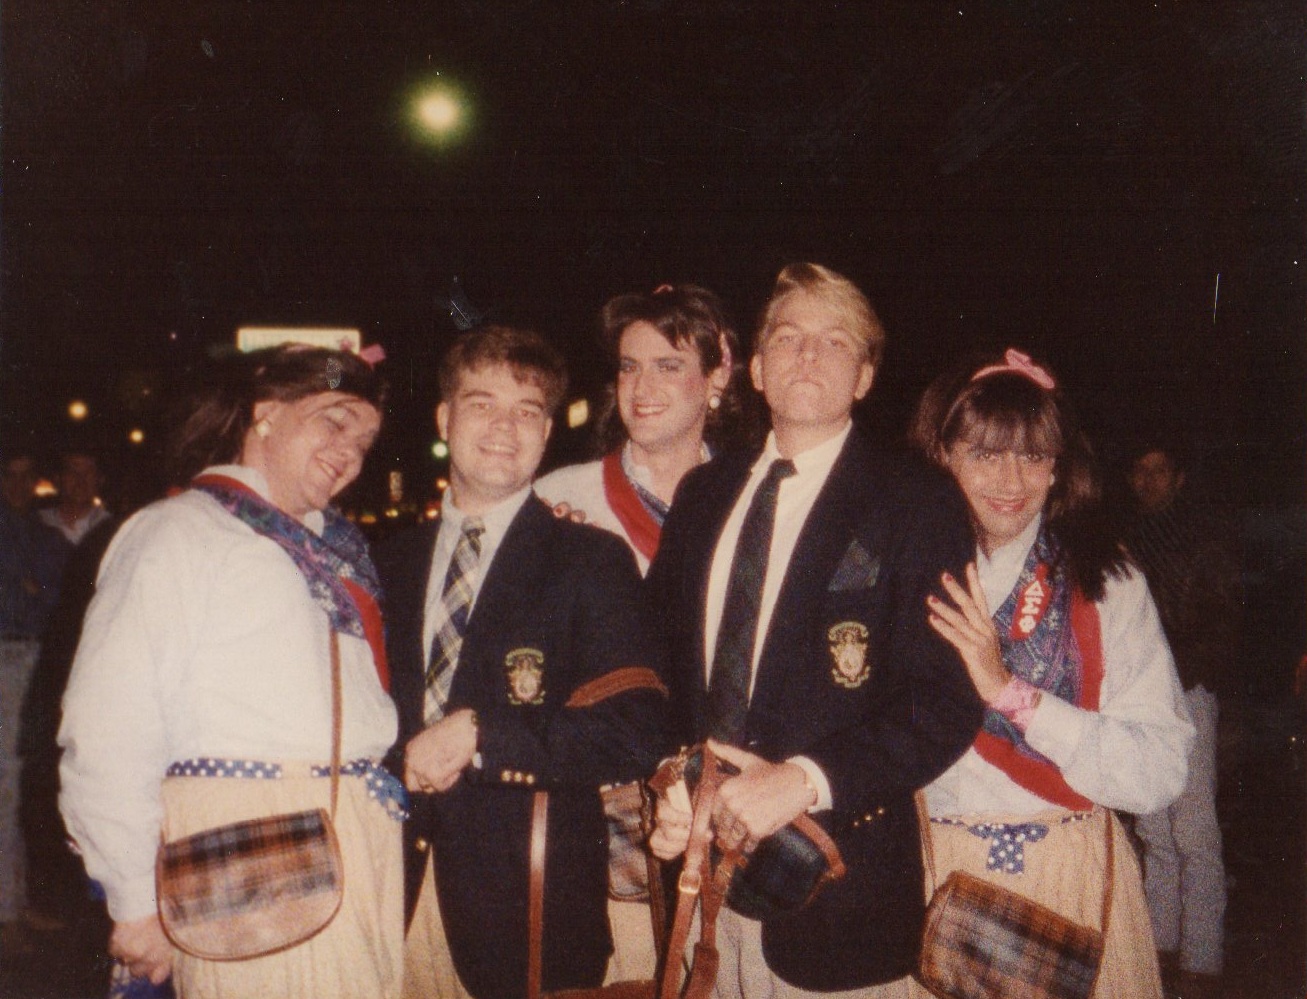
My bestest friend at the time was my fraternity brother Lenny. If I was 19, Lenny must have been 21. Lenny was always much older than me. He was (and still is) a portly, lockjawed man-child who was always fortunate enough to be my “Lucy”….and I, his willing “Ethel”. We both shared an affinity for Polo oxfords with madras ties, J.D. Salinger novels, all things British, and the pink and green bullion crested navy blue blazers that active fraternity brothers had the privilege of wearing.

Here we are in 1988 with a some not too cute sorority girls, and the aforementioned crested navy blazers.

Lenny and Sean with Sorority Girls

“Wouldn’t it be fun to have an Upscale Tailgate?” To this day, I still think it was all Lenny’s idea.” We could do the whole shin-dig out of the back of Siegelbaum.” Siegelbaum was the name Lenny had given to his navy blue Saab hatchback.

Our total budget was $100. It doesn’t sound like much now……and I assure you, it wasn’t very much in 1988 either.

We had to be clever….and clever we were.

The 2 of us, armed with our parent’s “In Case of Emergency Only” college credit cards, hit Service Merchandise, J.C. Penny’s and Sears for assorted silver-plate serving pieces and even a huge pressed glass punchbowl. The highlight of the quest was when Lenny found a 2 foot tall champagne bucket with handles at an outlet store. It looked just like a polo trophy. This was to be our center piece. Every serving piece box was carefully kept in the original store bag with a meticulously taped-on reciept…they would all be cleaned, repackaged and returned to the stores the Monday after the party. I “borrowed” 100 white linen napkins from my campus job in the faculty club. A candelabra, we absolutely had to have a candelabra…..and Lenny knew of one with 4 arms that we could use for the evening.

It was all coming together nicely.

All $100 we spent at the best grocery store in Lubbock. There were only 3 at the time.

That night, when everyone arrived convoy-style at the end of the dirt road, in the creek bed, Lenny and I were standing there waiting in our pink and green bullion crested navy blue blazers with our “upscale tailgate”.

A cassette of violin music wafted through Siegelbaum’s speakers.

Everything spread out perfectly on “rented” silver serving platers under that 4-armed candelabra in the back of a Saab. There was a small spiral cut ham, baby Swiss slices, Hawaiian rolls, and spicy grain mustard for making finger sandwiches. There were butter crackers for my famous 7 layer dip. We had home-made Quiche Loraine, and I think a handful of boiled shrimp. (Maybe 20 total) For sweets, there was a box of delicate little Danish shortbread cookies. The centerpiece was the trophy-shaped champagne bucket overflowing with carrots and celery like an edible bouquet of cru de te.

The only drink we offered was our “Upscale Tailgate” punch. The recipe came straight from a 1962 copy of the Ladies’ Home Journal. (This was before the internet) We served it in those tiny little glass punch cups with the handles that are too small for a grown man’s fingers to slip through. I still remember it as just a mound of sweet, green foam. Ingredients as follows – 2 cans of pineapple juice, 1 pint of lime sherbet, and 2 liters of Ginger ale. That’s all.

No vodka.

No rum.

No Everclear.

No fun …… for a group of wanting-to-binge-drink-’till-everybody-puked college kids. It never occurred to us that a few dozen fraternity boys, and their assorted girlfriends, didn’t want un-alchohol laden lime-sherbet punch…..or finger sandwiches……or quiche Loraine…… or even cru de te. They were expecting a keg at the end of that long, long drive. That $100 they alloted us would have covered the cost of a keg with some to spare for red Solo cups.

Nobody was amused.

We had neglected to mention that it was a B.Y.O.B. party and it was too late for anyone to drive back 2 plus hours to a liquor store, or even Taco Bell.

Lenny and I single-handedly managed to ruin the tradition of “Creek Bed” party.

As far as I know, this was the last time the party was ever attempted.

A few months later at our annual formal banquet, while everyone else in attendance was enjoying a fine steak dinner, Lenny and I were served cold, uncooked hot dogs on stale buns.

Payback, I assumed.

The joke was on all of them…….

because my date that night was a vegetarian.

and Lenny? He happens to like cold, uncooked hotdogs.

Share this:

  • Share on Facebook (Opens in new window) Facebook
  • Share on LinkedIn (Opens in new window) LinkedIn
  • Share on X (Opens in new window) X
  • Share on Pinterest (Opens in new window) Pinterest
Like Loading...

Aging Indian Baskets

Posted by James on May 18, 2013
Posted in: New Home, Projects. Tagged: coil baskets, Gunstock Stain, import stores, Jacobean Stain, Vintage Indian Baskets, wedding baskets. 2 Comments

I’ve always loved these vintage Navajo wedding baskets.

Vintage Navajo Wedding Basket

I wrote about the symbolism in them last year. It’s very beautiful if you care to read about it here.

OK, the prices are through the roof for an authentic, vintage one.

Of course, I thought, “I can do that”…..Well, not weave one……YET.

But I can certainly age one.

I started with a couple of coil baskets from import stores. I pick them up all the time for about 5 to 15 dollars. I found a few online places that have the same baskets El Paso Imports Co and El Paso Saddle Blanket . Just as cheap. I’m guessing that El Paso Texas is the place to buy cheap baskets.

My Simple Coil Baskets from Import Stores

I used 2 different colored stains. Gunstock (how could I not use a color called Gunstock?) and Jacobean (we used it on the wood headboard wall in the master bedroom). The first is light and the second is dark, y’all can use what ever combo you have in your garage too.

My 2 Stains for Darkening My Baskets - Gunstock and Jacobean

With rubber gloves and a clean rag, I start by giving the whole basket a coat of Gunstock stain being sure to rub deep into the groves.

Apply in the Gunstock Stain with a Clean Rag and Rubber Gloves

these new baskets are extremely dry and soak up the stain in no time.

Applying the Gunstock Stain to the Tall Baskt

They already look better.

All the “cream” color is now a warm “khaki”.

My Baskets After a Coat of Gunstock Stain

After the first stain is dry – I waited about 5 hours…so they were mostly dry – I gave a light skimming of the darker Jacobean stain.

Stain the Surface with Jacobean Stain to Age

I really just skimmed the surface, making some areas a little darker, and leaving the crevices light.

This will create some highs and lows in the basket color and make it look like it was genuinely used.

Lightly Skim the Surface with Jacobean Stain to Darken

Here are my finished baskets with the dark smudged areas. I made the edges just slightly darker than the surfaces.

My Baskets After a Skim Coat of Jacobean Stain

Now, I really let them dry this time…a couple of days….before using them.

Then we can “pepper” them back into our house where they are useful.

Full of bandanas in the bedroom…

Vintage Basket full of Bandanas

…holding the remotes in the den…..

Vintage Navao Wedding Basket full of Remotes

…..and some aloe in the breakfast room.

Vintage Look Basket with Aloe and Tea

Yepp, we were thinking the same thing,

Way, More, Much, Better.

Share this:

  • Share on Facebook (Opens in new window) Facebook
  • Share on LinkedIn (Opens in new window) LinkedIn
  • Share on X (Opens in new window) X
  • Share on Pinterest (Opens in new window) Pinterest
Like Loading...

Restoration Hardware Swing Arm Lamp

Posted by James on May 15, 2013
Posted in: New Home. Tagged: Dining Room, Kitchen, restoration hardware. 17 Comments

Loved this thing for years now.

Restoration Hardware Architect’s Boom Sconce. Modeled after a vintage lamp from the an architect’s 1940s studio.

Restoration Hardware Swing Arm Lamp

Pine, pine, pine……SCORE!!!!

Got one, a medium one. They come in 3 sizes, the largest of which is just plain enormous. It stretches out to more than 8 feet.

If we had a loft, I’d be all over that one….but (big sigh) we don’t; we live in a normal sized ranch house.

So, medium size will work.

When we first moved in to the Cavender house, I hung this Glass Globe Pendant from West Elm over our dining table.

West Elm Ball Pendant

Not a bad pendant…After all, there was a boob-light there when we moved in, So this was a Huge improvement.

But we are ready now for an update.

I cut off the plug and hardwired this new lamp (it’s a plug-in fixture for some reason) by running the power line in the attic from the old pendant across the ceiling and down the wall slightly….Now it will hang from the side wall, but still be controlled with the light switch and dimmer.

Gays and their dimmer switches, we do enjoy the ability to create mood lighting. It’s just so much more flattering. 3 years ago there was 1 solitary dimmer in the whole house. But we have solved that crisis now.

Because I’m pretty sure that someone (possibly me) will someday want a pendant back in this spot, I used a junction box to cover my connections instead of running a new wire from the switch.

Junction Box in the Ceiling

Then I squared off my ceiling hole and attached a new patch piece of drywall to hide my destruction.

Patched Hole in the Ceiling

I have posted about my skills at patching drywall several times already, y’all can read up on that here.

I have to really scrutinize the ceiling to see where it used to be.

Yeah, I’m that good.

Just take a gander at our improved breakfast room now…..

Kitchen Breakfast Area with Restoration Hardware Lamp

Finished Restoration Hardware Lamp in the Breakfast Room

Restoration Hardware Lamp over Loveseat

I’ll bet you are wondering if we hit our heads on it.

And No, we don’t. It’s positioned just perfectly so that we can manuever right around it without even thinking to duck….and it still lands in just the right spot over the table.

Restoration Hardware Lamp with Edison Bulb

I know that Edison bulbs are quickly racing out of style in favor of those curly blue-light-casting ugly things……….but I don’t care.

Pretty sure that I will never tire of these exposed light bulbs.

Better not anyway, they are all over the house…….

with dimmers.

Share this:

  • Share on Facebook (Opens in new window) Facebook
  • Share on LinkedIn (Opens in new window) LinkedIn
  • Share on X (Opens in new window) X
  • Share on Pinterest (Opens in new window) Pinterest
Like Loading...

Thom Filicia’s Old Lake House

Posted by James on May 13, 2013
Posted in: New Home. Tagged: Lake House, Thom Filicia. 2 Comments

I love Thom Filicia.

He was the “Interior-Decorator” gay on the all too short-lived Bravo series Queer Eye for the Straight Guy.

Recently, Thom documented a complete reno of a Finger Lake house in his newest book American Beauty.

The house is just as you would expect it to be…stunning. And perfect.

Maybe, ……a bit too perfect.

His new house looks like it could be on any suburban street.

I remember his former lake house as being more cozy. And just, well, more “Lake House-Y”.

See for yourselves.

Thom Filicia lake house domino

Thom Filicia Lake House Living Room

Thom Filicia Lake House Bar

Thom Filicia Lake House Kitchen

Thom Filicia Stair Well

Thom Filicia Lake House Den

Thom Filicia Lake House Family Room

Thom Filicia Lake House Porch

Thom Filicia on his Boat

Beautiful, am I right?

There is some internet debate as to weather this is Thom’s actual house, or a house he designed for a client.

Either way, doesn’t matter much to me,

I like it better.

Share this:

  • Share on Facebook (Opens in new window) Facebook
  • Share on LinkedIn (Opens in new window) LinkedIn
  • Share on X (Opens in new window) X
  • Share on Pinterest (Opens in new window) Pinterest
Like Loading...

More Than Just a Burger

Posted by James on May 11, 2013
Posted in: New Home. Tagged: Burguesa Burger, Ft Worth Ave, Oak Cliff Dallas, OAk Cliff Texas. 9 Comments

I love a good burger.

My softer-than-should-be midsection will attest to that.

What if…… a burger joint and a taco stand had a child? Hmmmm?

Well wonder no further my friend.

I present to you ….Burguesa Burger in Oak Cliff.

Burguesa burger

For a couple of years now, Burguesa Burger has serviced North Oak Cliff with the perfect mix of dirt-cheap Mexican food and American hamburgers.

Just don’t call it “fusion“, it’s not that fussy.

They offer breakfast burritos, “made-in-front-of-you” churros, Mexican cane sugar soda pops, fiery spicy french fries, cold beer, real ice cream milkshakes with a mini doughnut skewered on the straw…..

Aaaaaannnnndddddd, (wait for it) ……………………the most amazing hamburger ever……

La Monumental

The Monumental

No, you’re not misreading……Bean covered Tostada, Ham, Cheese, all Beef Patty, Cheese, all Beef Patty….(is all that even possible?)

I know, I had to read it twice too.

If there were a burger equivalent to a Luchador…this would be it.

The Monumental At Burguesa Burger

A little Mexican, a little cheezy, a little mysterious (someone please tell me what that special creamy sauce is)…and entirely entertaining.

Or make your own burger. Just name your toppings:

                                                  Avocado – they got that

                                                  Ham – they got that

                                                  Fried Egg…….yeah, they got that too.

What are you waiting for?

Get your buns to 710 Ft Worth Ave and try one for yourselves.

…and don’t forget the side spicy fries. Yes, spicy…don’t be a pansy.

Trust me, they might change your life.

Share this:

  • Share on Facebook (Opens in new window) Facebook
  • Share on LinkedIn (Opens in new window) LinkedIn
  • Share on X (Opens in new window) X
  • Share on Pinterest (Opens in new window) Pinterest
Like Loading...

Posts navigation

← Older Entries
Newer Entries →
  • The Cavender Boys

  • Buy My Book

    Check out the link below to get your copy of "DIY Industrial Pipe Furniture & Decor" by James Angus

    https://amzn.com/1612436064

  • Tags

    American Flag Apartment Therapy arts Backyard Bathroom Remodeling Beacon Blanket Big Tex Black Spray Paint Bloggers Can Lights Cedar Walls Christmas Christmas Decorating Christmas Ornaments Christmas Tree Crazy Mouse Ride Den Diane Keaton diy Doberman Earth Grout Edward Curtis Electrical Work Fletcher's Corny Dogs flower beds Frankoma pottery Front Yard Garage Garage Update Halloween Halloween Decorating happy halloween harley Harley Davidson home House Tour Houzz hudson bay blankets Ikea Ikea Borrby Lantern illustration july 4th Key West Trip Kitchen Remodel Living Room mantle Master Bathroom Master Bathroom Remodel Master Bedroom mercury ornaments merry christmas Modern Horizontal Fence Motherhood Paint Colors plumbing pipe Projects Ralph Lauren restoration hardware Russet Stain Shiny Brite Ornaments state fair of texas style Swiss Army Blanket Target technology Texas State Fair thanksgiving Thrift store Tile Backsplash travel vacation Vintage chair vintage christmas vintage ornaments Wood Wall
  • Recent Posts

    • Vacation ’24
    • Happy Halloween
    • Planes, Trains & the Occasional Uber
    • Family Secrets
    • Capitol T, and that Rhymes with P
  • Archives

    • June 2024
    • October 2023
    • June 2023
    • April 2023
    • July 2022
    • December 2021
    • July 2021
    • December 2020
    • October 2020
    • September 2020
    • August 2020
    • July 2020
    • June 2020
    • May 2020
    • April 2020
    • March 2020
    • February 2020
    • January 2020
    • December 2019
    • October 2019
    • April 2019
    • January 2019
    • December 2018
    • November 2018
    • October 2018
    • September 2018
    • June 2018
    • May 2018
    • April 2018
    • March 2018
    • January 2018
    • December 2017
    • October 2017
    • September 2017
    • August 2017
    • July 2017
    • June 2017
    • May 2017
    • April 2017
    • March 2017
    • February 2017
    • January 2017
    • December 2016
    • November 2016
    • October 2016
    • September 2016
    • August 2016
    • July 2016
    • June 2016
    • May 2016
    • April 2016
    • March 2016
    • February 2016
    • January 2016
    • December 2015
    • November 2015
    • October 2015
    • September 2015
    • August 2015
    • July 2015
    • June 2015
    • May 2015
    • April 2015
    • March 2015
    • February 2015
    • January 2015
    • December 2014
    • November 2014
    • October 2014
    • September 2014
    • August 2014
    • July 2014
    • June 2014
    • May 2014
    • April 2014
    • March 2014
    • February 2014
    • January 2014
    • December 2013
    • November 2013
    • October 2013
    • September 2013
    • August 2013
    • July 2013
    • June 2013
    • May 2013
    • April 2013
    • March 2013
    • February 2013
    • January 2013
    • December 2012
    • November 2012
    • October 2012
    • September 2012
    • August 2012
    • July 2012
    • June 2012
    • May 2012
    • April 2012
    • March 2012
    • February 2012
    • January 2012
    • December 2011
    • November 2011
    • October 2011
    • September 2011
    • August 2011
    • July 2011
    • June 2011
    • May 2011
    • April 2011
    • March 2011
    • February 2011
    • January 2011
    • November 2010
    • August 2010
    • June 2010
    • May 2010
    • April 2010
    • March 2010
    • February 2010
  • Enter your email address to follow this blog and receive notifications of new posts by email.

    Join 2,158 other subscribers
  • @CavenderDiary

    Tweets by CavenderDiary
  • The Cavender Diary

    The Cavender Diary
  • The Cavender Diary

    • RSS - Posts
    • RSS - Comments
  • Blogs Worth Watchin'

    • An Urban Cottage
    • Apartment Therapy
    • Beard and Pigtails
    • Brooklyn Limestone
    • Burlap & Denim
    • Camp Wandawega
    • Color Outside the Lines
    • Decorpad
    • Decorum DIYer
    • Den & Delve
    • Design Hazards
    • Domestic Daddy
    • Domestic Imperfection
    • Eclectically Vintage
    • Emily Henderson
    • Fourth Floor Walkup
    • Funky Junk Interiors
    • Handmade America
    • Heather Bullard
    • Houzz
    • I Heart Organizing
    • Japanese Trash
    • kara pasley designs
    • Manhattan-Nest
    • Merrypad
    • Nine Red
    • Our Humble Abode
    • Our Vintage Home Love
    • Pure Style Home
    • Red Bird Vintage Home
    • Roger & Chris
    • Sweetsuite
    • Tara Bradford Photography
    • The Brick House
    • The Inspired Room
    • The Lettered Cottage
    • The Recipe Grinder
    • Today's Nest
    • Vintage Revivals
    • West Eastern
    • Yellow Brick Home
    • Young House Love
  • Steal Our Style

    • American Photo Archive
    • Art's Not Dead
    • Barn Light Electric
    • Bauer Pottery
    • CB2
    • Decades Home
    • Design Within Reach
    • El Paso Saddle Blankets
    • Fiestaware
    • Jonathan Adler
    • Just Modern Decor
    • Lucky Stars Ranch
    • Pendleton
    • Pottery Barn
    • Ralph Lauren Home
    • Ranger Doug
    • Restoration Hardware
    • School House Electric & Supply Co.
    • Sonic Editions
    • The Curiosity Shoppe
    • The Land of Nod
    • Urban Outfitters
    • West Elm
    • Wisteria
Blog at WordPress.com.
THE CAVENDER DIARY
Blog at WordPress.com.
  • Subscribe Subscribed
    • THE CAVENDER DIARY
    • Join 1,063 other subscribers
    • Already have a WordPress.com account? Log in now.
    • THE CAVENDER DIARY
    • Subscribe Subscribed
    • Sign up
    • Log in
    • Report this content
    • View site in Reader
    • Manage subscriptions
    • Collapse this bar
 

Loading Comments...
 

    %d