THE CAVENDER DIARY

2 GROWN MEN vs a 40 YEAR OLD HOUSE

  • Home
  • Who Are We?
  • House Tour
  • To Do List
  • Projects
  • Recipes
  • Did Ya Know?
  • Books
  • Our Press

Now They Can Find Us

Posted by James on May 20, 2012
Posted in: New Home. Tagged: Black Spray Paint, diy, Spray Painted Curb Numbers. 10 Comments

No one can find our house….

Not necessarily a “Bad” thing……but for the umteenth time this week I had to over-direct a delivery guy to our house…”It’s the one with the orange door”, Duhhhh

What the Hell ? We hung new stainless numbers when we moved in….I can see them in the picture on our header. See them up there? Right over the mailbox? Well , you can’t actually see them from the street.

When I took a look at the curb I saw this…..

I wouldn’t be able to find us either…How many numbers are painted on there anyway?

Something had to be done…So we set out to repaint them.

I started with frog tape and white spray primer..

Frog tape is amazing…….The trick with spray paint is to do several light coats. It shouldn’t look perfectly solid until the second or third coat.

We primed the space white first because we wanted to do more than just “stencil”  the house numbers. We found these 5 inch adhesive house numbers at the H-Depot.

I cut them out of the little white rectangles with scissors and an exacto knife, then stuck them on our new primed white rectangle. I put them just slightly higher than center, so they would be on the top part of the curb.

I wanted the white to be revealed when I peeled them up. The concrete is very porous, and the numbers don’t stick very well, so the trick here is to prime white again over the numbers…..that way all the bleed-through will be white. I do this a couple of times, from a few different angles. Thin, light coats……

Next I sprayed a couple of coats of the black primer over the whole deal.

The heat of the day kept everything drying pretty quickly.

I carefully peeled up my frog tape and the adhesive numbers….and had this perfection….

A little bit of bleed through, but over all a thousand times better….and WAAAYYYY fancier than plain stenciled numbers…

Share this:

  • Share on Facebook (Opens in new window) Facebook
  • Share on LinkedIn (Opens in new window) LinkedIn
  • Share on X (Opens in new window) X
  • Share on Pinterest (Opens in new window) Pinterest
Like Loading...

Our Caribbean Cruise

Posted by James on May 17, 2012
Posted in: New Home. Tagged: Caribbean Cruise, Carnival Victory Cruise, Giant Clam Shell, hurricane irene, San Juan Cruise, travel, vacation. 13 Comments

Last year we “stepped outside our comfort zone” for a vacation and traveled to St Croix instead of Key West. We saw it for the first time on “House Hunters International”  ( I know, first mistake ) and thought that it looked like a pretty cool place to visit. But it wasn’t cool, it just sucked. It sucked in a major way. We landed about 1 hour before hurricane Irene. The island was abandoned, decimated, and shut down for most of our stay. We couldn’t swim in the rough, dirty ocean, there was an island curfew of 6pm, and although we were electricity-free for most of our stay…our resort slapped a fee for power on our final bill.

Never doing that again,

When our dear friend Kylie, who works for AAA Travel, suggested a Caribbean cruise……..we were naturally a little resistant at first. But the price was just too good to turn down.

Neither one of us has ever been on a cruise before; and Kylie and her husband Gert would be going with us. We traveled with them a few years ago when they got married on Maui…..and then we stuck around and intruded on their entire honeymoon as well. Kylie and I have been friends since we worked together at Macy’s over 20-somethin’ years ago. Oy-Vey, 20 years…..

What the Hell? They were fun to travel with, and with acquired miles to fly on, the whole trip was practically free.

We were sailing out of Puerto Rico so we spent the night before in San Juan. Absolutely loved it. It’s very similar to Miami in feeling. When Columbus landed on the island in 1493, he named it San Juan. This makes sense because most of the Caribbean islands are named after saints. When Ponce De Leon landed there in 1508, he exclaimed, “Que puerto rico!” ( What a Rich Port ) and the name stuck. San Juan became the name of the first settlement.

This is the La Concha hotel where we stayed. La Concha means ” The Shell” in english, so I’m guessing that is pro’lly why there is a giant clam shell for a dining room. I was pleasantly surprised to find that it was right on the beach. Very “Hip”  Hotel…we plan to stay there again when we go back. Did I mention that it was across the street from Louis Vuitton? Well, it was.

I snapped this pic of Jamie sitting on the sea wall behind the hotel.

Here’s our dear friends Gert and Kylie with the San Juan coastline in the background.

Kylie found a great restaurant, JAM, for dinner that first night in San Juan. Pork, plantains, mangos…and of course Mojitos, what’s not to love about Puerto Rican food? ( please note that there were a ton of pictures of us eating…I apoligize….we ate a LOT, and for some reason felt the need to document all of our shame )

On Sunday morning we boarded the Carnival Victory for a 7 day, 5 island tour. St Thomas, Barbados, St Lucia, St Kits, St Maarten, and then back to San Juan.

This is the cheezy picture they surprised us with right after customs. I know, pretty goofy. Especially the backdrop. BUT this is by far the Most Flattering picture of Me the entire trip…..just keep reading, I’ll prove it.

Our room was actually a decent size, I was expecting way smaller. Like a pop-up Air Stream trailer with a toilet in the middle of the shower. But it was actually pretty livable. Waiting for us there was champagne, chocolate covered strawberries, ………………..and 2 twin beds.

Some romantic cruise, hugh?

Monday morning we woke up in St Thomas……BREATH TAKINGLY Beautiful…See for yourself. This is the view of the bay we were in.

And the other side…

Just Amazing…we decided right then that our next trip would be back to St Thomas. That’s our ship docked right behind us here.

We spent the day snorkeling at Magan’s bay with the sting rays. Can you believe it? This is where we swam all day!

Lunch was at Senior Frogs. ( Huge Sigh ) It’s pretty terrible Mexican food for spring-breakers, and they made us wear balloon hats, but it was the closest restaurant to the boat..

The next day was an entire “Day at Sea” while we headed to Barbados. We boys kept ourselves busy all day…with these…..Don’t be fooled people, there’s about 1/8 an ounce of rum in each… and only 8 bucks.

We had heard of formal night on a cruise ship before, but didn’t really know what to expect. After all, it was a Carnival Fun Ship, not a ball at the Plaza. I’m just glad that we brought long pants and sport coats. Jamie packed a bow tie. Everybody else on board took it very seriously… like it was an adult prom. There must have been 20 photo booths set up on our way to dinner and people were lined up for days to be photographed in “Hoochie” gowns and rented tuxedos in front of canvas backdrops of Grecian columns and lavender fields. WTF?

The island of Barbados was not nearly as beautiful as St Thomas, and we were hounded all morning by cab drivers wanting to show us the island. Realy hounded. Luckily we had plans to swim with the sea turtles. All 4 of us had already done this on Maui…so it was a little uneventful. The other 40 people on our excursion hadn’t….so the water was a little crowded, but still a beautiful turquoise.

There was another tour group on an actual pirate ship and shot things at us from cannons. Not cool. We did however discover Rum Punch on the way back to shore…Marvelous Stuff…

We woke up on St Lucia to rain, rain, rain. We booked a double excursion to tour the island on a catamaran, then a van drove about 10 of us to a few island attractions. Double the Fun

The St Lucian’s are very proud of the two Pitons at the south end of the island. Pretty sure that I am blocking one of the mountains…Thanks Kylie.

Our catamaran pulled into a little cove and we were accosted by natives on little canoes selling conch shells, carved turtles, and ( ahem ) weed. ” I got da medicine, Mon” was the call. We bought the first 2 items. JUST, the first 2.

Kingsley was our driver for the second half of the day. He explained in great, exacting detail how bananas are farmed. And how the British developed the sugarbeet, therefore destroying the sugar cane economy of St Lucia. St Lucians all rue the day that the sugarbeet was ever found, or sprouted, or created in a lab. However it came to be…it realy screwed them over big time; and they will gladly tell you all about it. Kingsley was the only St. Lucian that we had long conversations with, and everything that he said…he said twice. They hate the sugarbeet. BTW

What sugar cane is still produced on the island is used in making rum. Luckily he took us to a rum distillery. Where we sampled the rums….Coconut, Lime, Coco…..


And tried on the costumes that the natives wear for the “Carnival” festival.

On Saint Kitts our cab driver, Bingi, took us to the southern arid part of the island where we could see the Atlantic Ocean and the Caribbean Sea at the same time and the sister island Nevis. Atlantic to the left, Caribbean to the right….Nevis is straight ahead in the mist. There are about 400 documented ship wrecks between these two small islands.

Then he dropped us at Reggae Beach for the day. It was one of those places that you see in the movies, where people bring frozen drinks and conch fritters right to your beach chair. They also had women offering aloe messages for $35, but none of us partook in one. We rubbed aloe on each other for free every night …so, no big loss.

St Kitts has an actual population of feral monkeys. For a price, you can take a few pictures with them. I wanted to document the exact moment that these two contracted head lice…so, here it is. ( Kylie just informed me that her priority was to find a monkey that was “diapered”…..for obvious reasons )

Saint Maarten was our last island to visit. Just as beautiful as Saint Thomas….think we might be headed back there as well. Can’t quite explain why I am doing the third ballet position in this picture.

Kylie had read that there was a sunken galleon that we could snorkel over. The first 2 guides she talked to told her that the only way to reach it was but $50 excursion, but the 3rd person she spoke to had a different answer. ” Just go to Little Bay and swim out to it, Mon.” So, swim from Little Bay we did. It’s hard to tell in the water, but I think it was maybe half a mile out. Not only was there a sunken galleon, but a helicopter and a submarine too. There weren’t many fish; Kylie saw a small shark, and I saw a barracuda. That was about it. All those machines underwater was just kinda creepy.

This is where we discovered Sint Maarten Guavaberry rum. Gert and I refreshed on Guavaberry rum coladas. So delicious, I picked up a bottle of Passion Fruit as well. Unfortunately, the only way to buy the rums is to visit the shop on the island……but hot sauce is available online. Sorry

Back to the ship for our last dinner. We never did drink the champagne from our cabin, so we did that night. Just as we emptied it, some friends that we met on our first night aboard sent us a second bottle. The horror. We were forced to down 2 bottles. And yes, that was the amazing view from our dinner table every night…we were at the very back ( stern ) of the ship.

I said earlier that none of us had ever been on a cruise before and were expecting the worst. There were about 2,000 tourists and 1,000 crew members…..and I was anticipating that all of them would be in my/our way the entire trip. But it wasn’t like that at all.

We had a great time, and would do it all again in an instant…..

Share this:

  • Share on Facebook (Opens in new window) Facebook
  • Share on LinkedIn (Opens in new window) LinkedIn
  • Share on X (Opens in new window) X
  • Share on Pinterest (Opens in new window) Pinterest
Like Loading...

Re-Visiting Our TV Console

Posted by James on May 13, 2012
Posted in: New Home. Tagged: clever idea, Den, diy, House Tour, Ikea, Ikea Bookcases, piece of furniture, Projects, Water Based Ebony Stain. 3 Comments

A few months ago, we did a detailed photo shoot of our den. Everyone seemed to love our TV surrounded by pictures.

We thought it was a clever idea to use 2 Ikea bookcases turned on their sides as our television console….

It was clever, it just wasn’t complete is some way.

I am one of those people who is never satisfied with something the first time I do it.

I had always meant to build a base for it to stand on…Something that made it look a little more like a piece of furniture and not a couple of Ikea bookcases on their sides. As usual, I broke out the power tools to build a 2X4 base with a well-mitered select pine 1X4 trim on the 3 showing sides.

Then I stained it with water based Ebony stain. Water based stain dries quickly, washes off hands easily, and doesn’t have toxic fumes.

We took this opportunity to take everything off the console, dust profusely, and even rewire all the TV components…..’Till it looked more like this…..

I know, I know,…..Way. More. Much. Better

And yeah, Titanic was on at the time………

<a href=”http://pinterest.com/Chznone/”><img src=”http://passets-cdn.pinterest.com/images/about/buttons/follow-me-on-pinterest-button.png” width=”169″ height=”28″ alt=”Follow Me on Pinterest” />

Follow Me on Pinterest

Share this:

  • Share on Facebook (Opens in new window) Facebook
  • Share on LinkedIn (Opens in new window) LinkedIn
  • Share on X (Opens in new window) X
  • Share on Pinterest (Opens in new window) Pinterest
Like Loading...

My Traveling Companion Retires

Posted by James on May 4, 2012
Posted in: New Home. Tagged: Ralph Lauren Rugby, Rugby Bag, Rugby Indian Patch. 5 Comments

It’s a sad thing when a relationship is over.

We had some Great times together.  He was right next to me almost every day of my life for the past 5 years. He worked next to me every work-day. Every flight I took, he was right there. Every mountain I climbed, he climbed it with me.

After 5 years together, we I have decided that he won’t be joining me on my next trip ( a Caribbean cruise tomorrow ).

Of course, I’m talking about my canvas “Man-bag” with the Indian patch. Who did you think I was talking about?


I found him at Rugby, on the sale rack no less. Heavy canvas/ recycled sail cloth, leather strap and buckles. And the price? 22 BONES. Un-freaking-believable!..How could I pass that up? That patch, I sewed that on myself a few weeks later. It’s my very favorite part.

Here are just a smattering of the numerous travels we shared……Jamie was behind the camera in all these pics

Alberquere
Alberquere
El Paso
El Paso
Key West
Key West

Las Vegas
Las Vegas
Maui
Maui
Pheonix
Pheonix

Santa Fe
Santa Fe
St. Croix
St. Croix
St Louis
St. Louis

It’s time to part ways. I just don’t think he is in shape enough to travel anymore. In actuality, he’s kinda gross, just down-right grungy dirty,( dirt, chocolate, blood?, red wine?, grass, indigo, possible elephant dung  – just don’t ask – ….) He’s supposed to be a little weathered……but not “sticky”.  

No worries though, I have an absolutely unused exact “Back-Up” ready to go. Remember that they were only 22 bucks? and the patch 10.

I have duplicates of several of my favorite things.

Not…Weird…At…All.

The Cavender Diary will take a brief hiatus, while Jamie and I take a well-deserved vacation…….Unless I can find enough bandwidth to drop a new post.

Share this:

  • Share on Facebook (Opens in new window) Facebook
  • Share on LinkedIn (Opens in new window) LinkedIn
  • Share on X (Opens in new window) X
  • Share on Pinterest (Opens in new window) Pinterest
Like Loading...

Grocery Store Orchids

Posted by James on May 1, 2012
Posted in: New Home. Tagged: bamboo skewers, jute twine, Keeping Grocery Store Orchids, Phalaenopsis, Potting Orchids, white orchids. 3 Comments

I’ve had a lot of people ask me lately how we can afford to have beautiful live orchids in our house.

Simple answer, we buy them at the grocery store…then “Whomp” them up to look like they came from a high-end florist. All those years working for prissy,  I mean NICE, florists has paid off.

Now I have the chance to share a couple of florists secrets with you kind folks.

The big white orchids are Phalaenopsis, or “Moth Orchids”. They are by far the hardest to keep happy at home, and usually only last a few days…maybe a week. Keep them moist ( NOT wet ) and in a bright window to extend their lives. For some unknown reason, the darker the flowers are, the longer the blooms last. I’ve had purple ones that simply refuse to die. If you are buying yours at the grocery store, $15-$25 is a pretty good price, try to buy the ones that have no brown edges, firm – not limp – leaves, and plenty of unblossomed flowers. These will give you the most “bang”.

Just like these beauties that I picked up at Ikea for, get this, $9.99 each. I know, they were so cheap, cheap, cheap that I bought 2.

Keep them in the plastic pots they come in, just hide them in something more attractive. Orchids are really parasites that cling to trees, and do not like to be buried in dirt. Their roots need to breathe, and they will come in just the right mixture of bark and peat to keep the roots moist but not wet. It took some work, but I managed to shove both plastic pots into this lid-less sugar canister that we use for house plants.

Store bought orchids will have plastic buterfly clips or, even worse,  twist ties holding them up on unnaturally green bamboo skewers. Never keep these on….they do NOT look professional.

Instead, I replace the whole architecture with natural looking bamboo and jute twine. If I have 2 orchids in a pot, I build a little frame like this….

Then I stake it in the pot, carefull not to pierce any roots; and tie it together tightly with the jute twine. Just…like…. so…

Next I delicately tie the orchid stems to the framework with the jute. I do this pretty lightly so as not to damage or choke the poor orchid. Don’t touch the flowers, that will make them turn brown too.

I finish the pot off with some peat moss, or better yet…..shiney white pebbles, to hide all the plastic pots inside. I mist them with fresh water every week or so if they are in a bright window ( with indirect sun ), but the humidity of a bathroom will keep them happy for a while.

$20 investment, looks like $150 orchid…pretty simple.

Steal this idea…..

Share this:

  • Share on Facebook (Opens in new window) Facebook
  • Share on LinkedIn (Opens in new window) LinkedIn
  • Share on X (Opens in new window) X
  • Share on Pinterest (Opens in new window) Pinterest
Like Loading...

Chucks Electrical Work

Posted by James on April 29, 2012
Posted in: New Home. Tagged: Electrical Work, Replace Electrical Pannel. 9 Comments

I know that y’all think that Jamie and I are pretty handy around the house. And we ARE. But there are some things better left to the professionals. Our friends are equally as talented, like our dear friend Chuck. He is a true Renaissance man and has helped us with some problems that we just couldn’t solve ourselves…..like electrical stuff.

I can wire a lamp. I can replace a ceiling fan. I can install recessed can lights, and I can even replace a switch or an outlet….usually by myself.

Chuck has helped with all the odd-ball electrical problems this house had.

He moved the garage light switch out from behind the refrigerator and into the garage. ( Behind the refrigerator???? Seriously?? )
He installed a second safety light under the eaves in the backyard…..when I just couldn’t fit in the attic. (I’m a big guy, I admit it)
And he moved a double switch in the living room over 14 inches through solid load-bearing studs.

Before…..see it there?  Behind all the bottles?

During…Chuck positioning the new box just right….

And after…..where it should have been all along…..

We finally put Chuck to the test and asked him to replace the sad little electrical panel in our garage. Not everything about updating a home is glamorous and awe-inspiring, but necessary none the less. We are trying to document every major change that we make..and this was a big change for us.

We weren’t really sure just what was wrong with the 40 year old breaker box, just that the house inspector recommended that we replace it on his inspection.

This has got to be a scary sight for any homeowner. Each of those wires matches up with a new breaker.

The new panel housing fits right over that mess of wires, and directly in-between studs.

Chucks father is a retired master electrician, and helped out on this install. I just love an electrician in overalls. Don’t you?

After a couple of  internet-less hours  and buzz words flying around, like “New Dedicated Circuit”, “Demand Load Calculation”, and “Breaker Replacement”, we finally had our brand spankin’ new electrical panel. The old one was 125 amps…this baby is 200. AND, we now have a master shut off switch on the outside of the house……something to do with city ordinances….that we now comply with.

Thanks Chuck.

She’s a Beaut’!

Luckily for everyone, there is an anal retentive living here, and he used his label maker to label all the breakers.

I’m not naming any names. But I think y’all know who he is.

Share this:

  • Share on Facebook (Opens in new window) Facebook
  • Share on LinkedIn (Opens in new window) LinkedIn
  • Share on X (Opens in new window) X
  • Share on Pinterest (Opens in new window) Pinterest
Like Loading...

The New Kitchen is Revealed

Posted by James on April 22, 2012
Posted in: House Tour, New Home. Tagged: Can Lights, Earth Grout, Hjuvik Faucet, House Tour, Ikea Cabinets, Industrial Faucet, Jonathan Adler Whale, Kitchen Remodel, Mrs. Meyers Cleaning Products, New Stainless Appliances, plumbing pipe, Spice Drawer, Tile Backsplash, Travertine Backsplash, Vinatge Oil Jars, Vintage chair, Vintage Fiestaware, Vintage Mercel Brewer Chairs, West Elm Pandant. 32 Comments

Well, It certainly took long enough….

After all, we started shopping for granite counters on February 11…..the workmen started tearing up the old kitchen on February 18.

For the past couple months, we have done some major project in the kitchen every weekend. I have actually been pretty diligent in documenting all the changes, and I’m so relieved to reveal our finished kitchen to all of you fine folks.

Just to refresh everyone’s memory, here is what we started with.

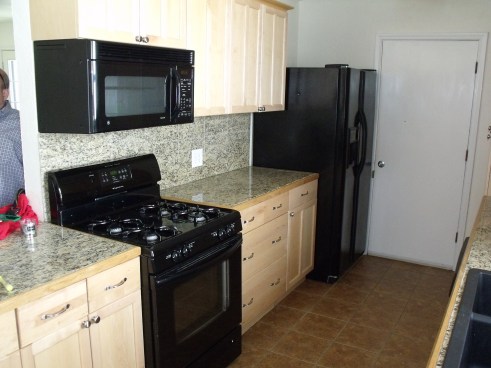
Yepp, I agree, pretty uneventful…..

And here’s what she looks like today ….

Yes, “The Bomb-Diggity” is the exact phrase we were thinking too.

When we bought the place, there was actually a fluorescent tube light fixture on the ceiling, just like in a middle-school classroom. Now there is a row of halogen cans and a glass dome pendant from West Elm.

Our Ikea Saarinan-esque table is surrounded by vintage Mercel Brewer Cesce chairs. At one time they had cane seats too ( cane seats don’t last very long ) and someone changed them to vinyl. A friend brought them over to sell in a garage sale, when they didn’t sell he offered them to me instead of dragging them back to his house. At the time, I didn’t really want them. But now, I absolutely LOVE them…each one has a numbered plaque that identifies them as property of the University of Texas. How cool is that?  The cane seat-backs are definitely showing some wear and I plan to have them replaced in the near future anyway.

I’ll keep y’all posted on that process.

As y’all can tell, we kept the original base cabinets and terra-cotta floor. Then we added our own bit of jazz to make this place a little more contemporary.

Taking the upper cabinets to the ceiling made the whole room appear taller. It also increased our storage space by about 40%. Although we lost the tiny cabinet with the attached microwave, we added an entire new cabinet over the refrigerator, and built out the top of the pantry to look finished.

That springy industrial looking Hjuvik faucet from Ikea is just amazing. Unpronounceable name, great faucet. I can bend it any-which-way, or push the whole thing out-of-the-way altogether.

LOVE it!

Yes, we had wanted a farm-house sink, but reconfiguring the lower cabinet was just too much of a hassle. So we settled on one really big  28 inch undermount stainless sink….and don’t regret that decision one bit.

A vintage plate is the perfect size to wrangle dish and hand soaps, hand lotion, and sponges. If you have never tried Mrs. Meyers cleaning products, let me lead you to them right now. Lavender is by far my favorite, but other flavors include;  Basil, Geranium, Rhubarb, Blue Bell, Rosemary and even a scent free. Thelma Meyer believes that cleaning products can be Earth friendly and still clean well……so do we.

Check them out.

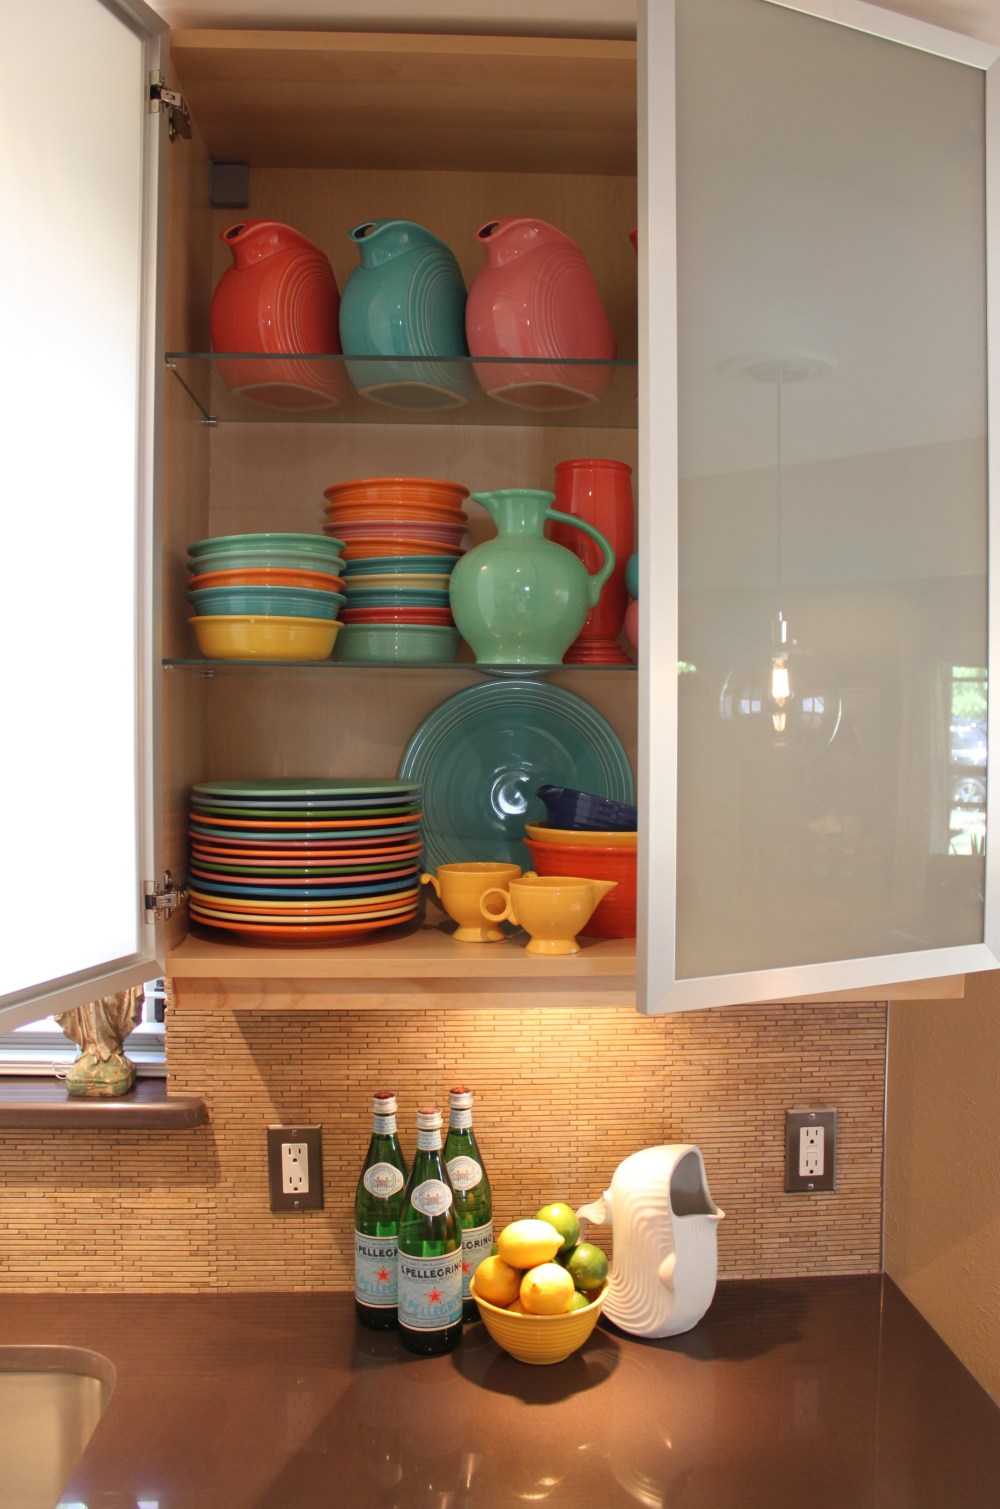
About 15 years ago I started collecting Fiesta Ware.

I’ve always loved old California pottery, the colors are bright, but not too bright. They remind me of  the painted desert. It’s hard to believe that Homer Laughlin stopped making Fiesta for about 13 years, before reviving the line in the mid-80’s because of the Baby-Boomers demand for the things that they had a children. I have tons…and when I say “tons”, I have packed and moved this stuff several times, trust me, I have “TONS”.

I pick up vintage Fiestaware, Bauer, Yellowware, and Russell Wright whenever I find them. I have an affection for chipped pieces that were obviously used and loved.

The frosted glass doors of our new upper cabinets show just a hint of the vibrant colors lurking behind each.

Cabinet full of Fiesta

The Jonathan Adler whale was an anniversary gift from Jamie, he holds bottle caps because I can’t possibly throw away a bottle cap. Duhhh, I might have a project for them some day.

The travertine backsplash that we installed ourselves was just the perfect complement to the new “mink’ granite counters.

We replaced the previous owners strange taste/placement of handles with some that fit the contemporary style of the new kitchen better.

The upper cabinets, with brushed stainless doors, we left unadorned.

Everything looks better in a jar…..especially dog treats. She can hear the Milkbone jar opening from the other side of the house.

The was nothing above the old pantry but 14 inches of air.

Now there is a perfect place to keep cook books.

I’ve been collecting oil jars for a few years too.

They functionally hold plastic grocery bags, tennis balls ( if she can’t see them, so won’t want us to throw them for her), and arrows.

The Luftig vent-a-hood came from Ikea too.

You could probably tell that from the name. There was an electrical outlet where the old microwave was plugged in up there before, so installation was a snap. I just removed the outlet, and hardwired the sum-bitch to the cable that used to power the outlet.

Done Deal.

The new range is a dream. (The delivery – NOT so much)

We are just going to live with that sore-thumb of a black refrigerator until we pay off the other new appliances.

The upper cabinet, just to the right of the new range, holds salt, pepper, garlic, and oils and vinegars I’ve put in upcycled hinged cork-topped bottles.

The bottles were originally sold with lemonade in them. Never do this with balsamic vinegar because it needs a dark bottle to protect it from sunlight and loosing its flavor.

Because the new upper cabinets have glass doors, we couldn’t mount the spice rack we had planned.

The next best thing was a drawer full of dried herbs and spices. Sunlight can drain the flavors from these as well, so a dark drawer is much better than a glass cabinet anyway. We rarely cook with dried herbs, fresh ones are 100 times better, but look how awesome they are all lined up like toy soldiers.

Don’t hate us because of our organizational skills. I’m working on a future post now where I show how I used wood trim pieces to keep them all in place.

The drawer on the other side of the range has a pretty clever idea as well. I always line my kitchen and bathroom drawers with self-adhesive cork shelf liners to keep things from shifting arround. But here I took it a step further and also mounted a knife magnet inside the drawer. Keeps them in place, and from dulling too quickly.

You can steal those two ideas too.

And now for the “Adults Only” part of the kitchen tour.

We finally have a real liquor cabinet. Just like big boys. No more digging to the back of the pantry for triple sec. We have it all lined up where we can see everything that we have in a glance.

This is gunna work great for parties……glasses above, ice-maker to the right, and plenty of counter space below to slice lemons etc.

LOVE IT!

Remember when we sliced PVC plumbing pipe to make our wine storage? It wasn’t that long ago. Now we have a perfect place to put our wine, where there was nothing before.

Everyone wanted to know what our solution for the microwave was.

I’ve never been a fan of the microwave hanging over the cooktop. It’s not a Bad place to put it…just not very esthetically pleasing; especially when the previous owner installed it with the side exposed and facing the rest of the house. We do use the microwave, but mostly just for steaming veggies and reheating left-overs. Rather than just put it on the counter, or even worse, a cart with wheels ( I have Never liked that look ) we hid it the best that we could in a cabinet next to the fridge.

It’s perfect for us.

I drilled a hole in the side of the cabinet to run the power cord through, and we just plugged it in with the fridge. Plenty of room in there so it has air to vent and not overheat.

Here’s a reminder of what we started with….from this…

To this….

And from this……

To this…

And that is the Grand Tour of our new kitchen. I consider it to be about 95% finished. We still have to caulk around the counter top, and I’m not sure what to do with the BIG White Door to the garage. We are tinkering with the idea of chalk-board paint…maybe in khaki…it doesn’t always have to be black, ya know.

This was, by a LANDSLIDE, the best change that we have made to the Cavender house to date……

and we’re just getting started ….

Share this:

  • Share on Facebook (Opens in new window) Facebook
  • Share on LinkedIn (Opens in new window) LinkedIn
  • Share on X (Opens in new window) X
  • Share on Pinterest (Opens in new window) Pinterest
Like Loading...

New Kitchen Hardware

Posted by James on April 21, 2012
Posted in: New Home. Tagged: Brushed Stainless Hardware, Kitchen Remodel, Modern Kitchen Hardware. diy. 1 Comment

We didn’t like the hardware in our kitchen.

We didn’t like the size,  we didn’t like the placement,  we didn’t like the scale.

NO-Sir-E, not one bit. BIG doors on the pantry…little bitty handles..

That just wasn’t cutting it for us.

We wanted something with straight modern lines, that mimicked the stainless upper cabinet doors, something like this…..

I took this picture with my phone of the hardware display at Lowe’s…..See them there in the middle of the collage? Under STUDIO.

Just what we were looking for.

In true Lowe’s fashion, not a single employee knew where to locate, or even if Lowe’s sells, those particular drawer pulls.  In fact, most of the hardware pictured was NOT in the store or available for special order. How is that company even in business?? A-Ma-Zing

After several store visits, we settled on Elliot’s. The slogan at Elliot’s is “We Have Hardware”….and HAVE hardware they did. We should have started our search there. They had just what we wanted. They came in several sizes: 5 1/2 inches for the drawers, 7 1/2 inches for the cabinet doors…and for the pantry handles? They had 11 1/2 inches. Much more substantial than the little nubs currently on them.

Perfect, right? Well almost perfect. The handles had these weird little squares at the bases. More deco than modern. Fortunately, we just left them off.

Way, More, Much, Better.

I used the same top holes for the door handles….and the drawer handles we positioned up slightly from where they were.

The tiny screw holes we filled in with Elmer’s Natural Wood Filler. We hardly even see them now.

What about those way-too-small handles on the pantry doors? They look like this now.

OOHHH Yeah, That’s much better.

Share this:

  • Share on Facebook (Opens in new window) Facebook
  • Share on LinkedIn (Opens in new window) LinkedIn
  • Share on X (Opens in new window) X
  • Share on Pinterest (Opens in new window) Pinterest
Like Loading...

Rick and Laura’s Wedding

Posted by James on April 16, 2012
Posted in: New Home. Tagged: Chaumet Winery, Hostess Wedding Cake, ribbon vases, St Louis Wedding, St Louis Wine Country Wedding. 3 Comments

When my dear friend Laura, who moved to St. Louis a few years ago, asked me to do the flowers for her wedding…my first thought was all white… or white with lime green. Isn’t that what most typical brides want these days?

Then I got the “Save-The-Date” card.

And the invitation…..

See what I mean?

This was definitely not a “white floral” wedding, or typical bride. Her gown, after all, was going to be navy. Laura and I agreed that her floral colors would be; bubble gum pink, orange, turquoise, purple, chartreuse, and lipstick red. Rick, the groom-to-be, likes whatever Laura likes….isn’t that easy?

Having never been to St. Louis, Jamie and I spent the day before the wedding taking in the sights…. which is pretty much just the Gateway Arch.

They don’t tell you this before hand, but the trip up to the top of the St Louis Arch is Scary-as-Hell. I do NOT recommend it if you are acrophobic, or even slightly claustrophobic. The accent to the observation deck is in an almost windowless pea-shaped car the size of 1/4 of a Fiat. It took us, and the 4 other hefty midwestern strangers shoved in there with us, 4 minutes to get up there in that round coffin…..coming down it take 3 minutes. Thank you gravity. They also forget to mention that the arch swings from side-to-side. It’s supposed to be “slight”, most people don’t even notice. Jamie and I are most definitely NOT “most people”. We both felt the swinging immediately. After a 2 hour wait, AND a 4 minute nightmare inducing accent, we lasted about 1 minute and a half before we had enough swaying at 600 feet in the air.

Still worth doing if you’re ever in St Louis….but I only recommend it for the truly fearless. Like bungee jumping naked.

We mailed everything we needed ( vases, votives, tools, buckets, a watering can, ribbon,  everything…) weeks before the ceremony. All we had to do was pick up the pre-ordered flowers from the wholesaler before the 2 hour drive to the Chaumette winery in Missouri wine country. Did you know that Missouri had a wine country? We didn’t either.

Here’s our flowers soaking up water in our hotel room before we moved everything to the rental car. Mostly roses, but there are also pincushion Protea, chartreuse spider mums, tulips, Dianthus, and Hypericum.

After a 2 hour drive through twisty Missouri back roads, we arrived at our “UN-Map Questable” destination. Just look how beautiful the Chaumette Winery is…..

The cabin we stayed in was in this clump somewhere…I think the bridal party took up most of these cabins. They were A-Ma-Zingly cozy. Our cabin had plenty of room to do the centerpieces. We opened our french doors overlooking a pasture full of cows while we worked on the centerpieces.

The ceremony was held in a charming free-standing chapel on a hill overlooking the breath-taking winery property.

Laura wanted silk hand-tied flowers for the chapel so she could save them and make a wreath later. We made them in advance and shipped them with all our supplies.

They look very close to the “real” flowers we used for the reception. Dalias and Peonies were on the bill for the fresh centerpieces, but unavailable in April…so it was good to at least have some represented in silk.

I love pictures of the bride and groom right after the ceremony. Bubbles all around.

The reception was in the wine barrel storage room, an intimate spot under the main tasting room of the winery.

Jamie and I wrapped ribbon around cylinder vases in advance…and then picked up those colors in votives from an online candle site.  All of Laura’s colors look extra vibrant on simple white cloths.

Laura likes a little sparkle…if you look closely there are tiny colored rhinestones set into the flowers.

Since the room was so intimate, we filled it with colored votives and synthetic gems to reflect all the candle light.  The bride’s mother found these cylinder vases, they were just perfect to bring some height to the mantle.

As soon as I saw these gems, I knew that Laura would just love them. The candlelight made them glisten like “real” jewels.

An A-typical bride would never have a typical wedding cake. Ding Dongs, Twinkies, Ho Hos…..Oh My. We stacked the Hostess treats on tiered cake plates.

Even the cake topper was a one-of-a-kind idea..tokidokis of Ciao Ciao and Adios….the ” ‘Till Death Do Us Part ” couple.

Happy First Anniversary Rick and Laura.

We had a great time at your wedding, and we’re so thrilled that we could have been a part of it as well.

Share this:

  • Share on Facebook (Opens in new window) Facebook
  • Share on LinkedIn (Opens in new window) LinkedIn
  • Share on X (Opens in new window) X
  • Share on Pinterest (Opens in new window) Pinterest
Like Loading...

Where to Store Our Wine?

Posted by James on April 14, 2012
Posted in: New Home. Tagged: diy, Kitchen Remodel, Modern Wine Storage, plumbing pipe, Projects, PVC Wine Rack. 12 Comments

Neither of us are wine drinkers. The Good Lord knows that I prefer the occasional beer, and I push Jamie towards Rum and Coke for his “Peace and Quiet Juice”.

Sometimes, I will buy a bottle of wine if the label is cool.

You know, if there is something awesome on it, like a cowboy or a red truck.  ( I’m not joking here….those 2 images will Always get me to purchase )

Somehow we have ended up a with a pretty good assortment of wine….must be from hostess gifts.

I had a plan to create some sort of  “wine storage” over our pantry…..where there was nothing before. I don’t quite understand why the previous owner didn’t take the pantry all the way to the ceiling? Something had to be done in this wasted space.

When I saw this picture in a magazine, I was fascinated by the concrete tubes he used for wine. Look at how cool those graphic circles look in this kitchen. A little modern, a little rustic…..just like our style.

Aren’t they just groovy as all Hell? I know! We had to find a way to do this in our own kitchen; and that empty space over the pantry seemed like just the right spot.

I Googled concrete tubes…and nada came up. But ya know what did? PVC…HHmmm That could actually work.

  • They’re cheap – about 15$ for 10 feet.
  •  I could cut them easily to any size that I needed with the chop saw.
  • A  4 inch thick pipe fits a bottle of wine just perfectly.
  • They are light weight, so very little stress on the press-board cabinet

Just one slight problem with our plan….the space over the pantry is was only 12 inches tall. That’s hardly enough space to do more that 14 PVC pipes, and I would have to fill in a lot of empty space with trim pieces to make it all fit tight.

But ya know where they would fit? Over the fridge…. in this weird space

Remember the Ikea cabinet that didn’t have any corresponding doors? It’s 24 inches tall. I know! It’s almost as if it were “meant” to be.

We cut 10 Foot PVC pipes down to 10 inch sections. ..They only come in 10 foot pipes. 10 foot poles are a bitch to transport, but we live pretty close to H-Depot. I wish the cut pipes fit more perfectly linear, like my inspiration kitchen, but the staggered pipe is still kinda modern to me. Just slightly more “honey comb” looking.

Now we have space for 21 bottles or wine.

I had to move the shelf up just slightly. The pegs holes are staggered about every inch, and my pipes pushed the shelf up about 1/2 inch. No worries, all I had to do was drill 4 more holes directly in between where Ikea thought they should be. I could have ditched the shelf altogether and filled the whole cabinet with PVC tubes, but I didn’t want to over do it with the wine.

Then the extra peg holes started to bother me. It just didn’t look finished.

That’s Elmer’s Wood Filler in Natural. We had already used it to fill the holes where the old drawer handles used to be.

It’s not a perfect match with birch, but it works for us.

We ended up with something that looks more like this…

Pretty Cool, I know!

“And whatever became of that wasted 12 inches of  space over the pantry?” you ask.

We used an extra Ikea shelf, some 1X2 trim, and the disassembled pieces from the old cabinet over the microwave…..and came up with this to store cookbooks.

Tons Way, More, Better….Right?

Share this:

  • Share on Facebook (Opens in new window) Facebook
  • Share on LinkedIn (Opens in new window) LinkedIn
  • Share on X (Opens in new window) X
  • Share on Pinterest (Opens in new window) Pinterest
Like Loading...

Posts navigation

← Older Entries
Newer Entries →
  • The Cavender Boys

  • Buy My Book

    Check out the link below to get your copy of "DIY Industrial Pipe Furniture & Decor" by James Angus

    https://amzn.com/1612436064

  • Tags

    American Flag Apartment Therapy arts Backyard Bathroom Remodeling Beacon Blanket Big Tex Black Spray Paint Bloggers Can Lights Cedar Walls Christmas Christmas Decorating Christmas Ornaments Christmas Tree Crazy Mouse Ride Den Diane Keaton diy Doberman Earth Grout Edward Curtis Electrical Work Fletcher's Corny Dogs flower beds Frankoma pottery Front Yard Garage Garage Update Halloween Halloween Decorating happy halloween harley Harley Davidson home House Tour Houzz hudson bay blankets Ikea Ikea Borrby Lantern illustration july 4th Key West Trip Kitchen Remodel Living Room mantle Master Bathroom Master Bathroom Remodel Master Bedroom mercury ornaments merry christmas Modern Horizontal Fence Motherhood Paint Colors plumbing pipe Projects Ralph Lauren restoration hardware Russet Stain Shiny Brite Ornaments state fair of texas style Swiss Army Blanket Target technology Texas State Fair thanksgiving Thrift store Tile Backsplash travel vacation Vintage chair vintage christmas vintage ornaments Wood Wall
  • Recent Posts

    • Vacation ’24
    • Happy Halloween
    • Planes, Trains & the Occasional Uber
    • Family Secrets
    • Capitol T, and that Rhymes with P
  • Archives

    • June 2024
    • October 2023
    • June 2023
    • April 2023
    • July 2022
    • December 2021
    • July 2021
    • December 2020
    • October 2020
    • September 2020
    • August 2020
    • July 2020
    • June 2020
    • May 2020
    • April 2020
    • March 2020
    • February 2020
    • January 2020
    • December 2019
    • October 2019
    • April 2019
    • January 2019
    • December 2018
    • November 2018
    • October 2018
    • September 2018
    • June 2018
    • May 2018
    • April 2018
    • March 2018
    • January 2018
    • December 2017
    • October 2017
    • September 2017
    • August 2017
    • July 2017
    • June 2017
    • May 2017
    • April 2017
    • March 2017
    • February 2017
    • January 2017
    • December 2016
    • November 2016
    • October 2016
    • September 2016
    • August 2016
    • July 2016
    • June 2016
    • May 2016
    • April 2016
    • March 2016
    • February 2016
    • January 2016
    • December 2015
    • November 2015
    • October 2015
    • September 2015
    • August 2015
    • July 2015
    • June 2015
    • May 2015
    • April 2015
    • March 2015
    • February 2015
    • January 2015
    • December 2014
    • November 2014
    • October 2014
    • September 2014
    • August 2014
    • July 2014
    • June 2014
    • May 2014
    • April 2014
    • March 2014
    • February 2014
    • January 2014
    • December 2013
    • November 2013
    • October 2013
    • September 2013
    • August 2013
    • July 2013
    • June 2013
    • May 2013
    • April 2013
    • March 2013
    • February 2013
    • January 2013
    • December 2012
    • November 2012
    • October 2012
    • September 2012
    • August 2012
    • July 2012
    • June 2012
    • May 2012
    • April 2012
    • March 2012
    • February 2012
    • January 2012
    • December 2011
    • November 2011
    • October 2011
    • September 2011
    • August 2011
    • July 2011
    • June 2011
    • May 2011
    • April 2011
    • March 2011
    • February 2011
    • January 2011
    • November 2010
    • August 2010
    • June 2010
    • May 2010
    • April 2010
    • March 2010
    • February 2010
  • Enter your email address to follow this blog and receive notifications of new posts by email.

    Join 2,158 other subscribers
  • @CavenderDiary

    Tweets by CavenderDiary
  • The Cavender Diary

    The Cavender Diary
  • The Cavender Diary

    • RSS - Posts
    • RSS - Comments
  • Blogs Worth Watchin'

    • An Urban Cottage
    • Apartment Therapy
    • Beard and Pigtails
    • Brooklyn Limestone
    • Burlap & Denim
    • Camp Wandawega
    • Color Outside the Lines
    • Decorpad
    • Decorum DIYer
    • Den & Delve
    • Design Hazards
    • Domestic Daddy
    • Domestic Imperfection
    • Eclectically Vintage
    • Emily Henderson
    • Fourth Floor Walkup
    • Funky Junk Interiors
    • Handmade America
    • Heather Bullard
    • Houzz
    • I Heart Organizing
    • Japanese Trash
    • kara pasley designs
    • Manhattan-Nest
    • Merrypad
    • Nine Red
    • Our Humble Abode
    • Our Vintage Home Love
    • Pure Style Home
    • Red Bird Vintage Home
    • Roger & Chris
    • Sweetsuite
    • Tara Bradford Photography
    • The Brick House
    • The Inspired Room
    • The Lettered Cottage
    • The Recipe Grinder
    • Today's Nest
    • Vintage Revivals
    • West Eastern
    • Yellow Brick Home
    • Young House Love
  • Steal Our Style

    • American Photo Archive
    • Art's Not Dead
    • Barn Light Electric
    • Bauer Pottery
    • CB2
    • Decades Home
    • Design Within Reach
    • El Paso Saddle Blankets
    • Fiestaware
    • Jonathan Adler
    • Just Modern Decor
    • Lucky Stars Ranch
    • Pendleton
    • Pottery Barn
    • Ralph Lauren Home
    • Ranger Doug
    • Restoration Hardware
    • School House Electric & Supply Co.
    • Sonic Editions
    • The Curiosity Shoppe
    • The Land of Nod
    • Urban Outfitters
    • West Elm
    • Wisteria
Blog at WordPress.com.
THE CAVENDER DIARY
Blog at WordPress.com.
  • Subscribe Subscribed
    • THE CAVENDER DIARY
    • Join 1,063 other subscribers
    • Already have a WordPress.com account? Log in now.
    • THE CAVENDER DIARY
    • Subscribe Subscribed
    • Sign up
    • Log in
    • Report this content
    • View site in Reader
    • Manage subscriptions
    • Collapse this bar
 

Loading Comments...
 

    %d