THE CAVENDER DIARY

2 GROWN MEN vs a 40 YEAR OLD HOUSE

  • Home
  • Who Are We?
  • House Tour
  • To Do List
  • Projects
  • Recipes
  • Did Ya Know?
  • Books
  • Our Press

Meet Mister Finch

Posted by James on April 19, 2014
Posted in: Did Ya Know?, New Home. Tagged: Lewis Carroll, Mister Finch, Soft Sculpture. 6 Comments

Somewhere between the fanciful and the macabre, lies Mister Finch.

Mister Finch Himself With One Of His Extra Large Moths

Using nothing more that scraps of fabric, thread, paper and wire this self-taught Yorkshire artist crafts charmingly creepy fairytale creatures.

I see a lot of inspiration from Lewis Carroll illustrations in them.

In his hands, worn velvet curtains become an enormous moth, a vintage wedding dress and pearls are now a tea-serving spider, and scraps of faux fur a stuffed and twisted into bumble bees. Every remnant he finds has potential to be something more magical. Mister Finch works alone and makes everything himself by hand in a studio full of books, glass jars and naughty cats. When he’s not crafting these amazing soft sculpture delights, about 12 hours a day by the way, he can be found reading and watching old movies.

Hare Dolls Made With Vintage Cottons by Mister Finch

Embroidered Moths by Mister Finch

Flower fox sleeping by Mister Finch

Textile Fungus Collection by Mister Finch

Large Velvet Spider by Mister Finch

Mice dolls by Mister Finch

OLYMPUS DIGITAL CAMERA

Soft Sculpture Owls by Mister Finch

Tea making Spider by Mister Finch

Textile Bees made from fake fur by Mister Finch

Textile Bird Collection by Mister Finch

Textile Fairytale Toadstools by Mister Finch

Mister Finch makes custom pieces upon request, if you’re so inclined. Since his Etsy shop is rarely stocked.

and he also has a blog worth scouring…..Trust me.

Happy Easter, Y’all


Share this:

  • Share on Facebook (Opens in new window) Facebook
  • Share on LinkedIn (Opens in new window) LinkedIn
  • Share on X (Opens in new window) X
  • Share on Pinterest (Opens in new window) Pinterest
Like Loading...

Woodland Theme Party Details

Posted by James on April 16, 2014
Posted in: New Home, Projects. Tagged: Design Master, Design Master Holiday Red spray paint, Gnome Party, Gnome Party Hats, Gnomes, Monogram Moss Wreath, Woodland Theme Birthday Party. 3 Comments

Here are a few of the details that we did to make Madeleine’s woodland themed first birthday extra special.

For the monogram wreath:

We started with a green foam wreath shape and an “M” cut from fiberboard. Both from the craft store.

Big M on the Green Foam Ring

With a glue gun I carefully glued sheet moss pieces to the wreath form. Got these at the craft store too.

Carefully Use a Hot Glue Gun to Attach the Moss to the Wreath Form

After spraying the “M” with Design Master Holiday Red spray paint, we punched dots from self adhesive craft foam with a hole punch and just randomly covered it.

Trust me, Jamie was punching dots for days.

Use a hole punch to punch out the Dots from the Craft Foam

Poke in a couple of wired silk Monarch butterflies and you have a pretty cute wreath,

Monogram Moss Wreath with Butterflies

For the toadstools:

We started with a bag of foam ball halves, again from the craft store.

Then sprayed them, also, with Holiday Red Design Master spray paint.  Design Master is made just for crafts like this…regular spray paint with eat right through the foam. Trust me.

Design Master Holiday Red Spray Paint Collage

With more hot glue we attached the toadstool tops to the sprayed white dowels.

…and again added foam dots punched from adhesive craft foam.

Assemble the Toadstools

We made 2 sizes and simply stuck them in all the ferns to keep things looking a little “cartoon-y” and not too serious. It was a kids party after all.

Toad Stools Tucked in the Ferns

For the gnome hats:

I disassembled a plain party hat from Party City and used it as a template to trace on a sheet of red felt.

Disassemble a Hat and Use it as a Template

After cutting out the felt hat shape, I gave them a good, heavy spritz of spray adhesive. The overspray is pretty messy, and you want to go as close to the edges as possible, so lay down a drop cloth to protect all the surfaces.

Use Spray Adhesive Liberally on the Felt

I gently rolled an assembled party hat over the red felt piece pushing down firmly as I went.

Roll the Felt on a Hat

Then used a pair of scissors to trim the excess felt……or possibly  hat, whichever needed trimming more.

Use Scissors to Trim the Excess Felt

Done, and how charming are these?

Finished Felt Gnome Hats

Most of the kids would only wear their hats for a few seconds.

The Only 3 Who Would Wear the Gnome Hats

At least,

The 3 biggest kids at the party didn’t want to take them off,

(Photo bomb by the birthday girl on tambourine)

Happy Birthday Party, Everyone.

Share this:

  • Share on Facebook (Opens in new window) Facebook
  • Share on LinkedIn (Opens in new window) LinkedIn
  • Share on X (Opens in new window) X
  • Share on Pinterest (Opens in new window) Pinterest
Like Loading...

Madeleine Is 1

Posted by James on April 13, 2014
Posted in: New Home. Tagged: Birthday Party, Madeleine, The Pecks, Walton Design, Woodland Theme Birthday Party. 15 Comments

Hard to believe it has been an entire year since little Madeleine was born.

And just slightly before that, we hosted her baby shower.

If you haven’t read these stories yet…please do, it’s a pretty good read.

Birthday Invite

See you at the birthday party…..

Party hosted by the proud parents, decor provided by your Cavender boys (with a little help from Walton Design)

Monogram Moss Wreath with Butterflies

Woodland Theme Party  with Mushroom Cupcakes on the Log Risers

Woodland Birthday Party Collage

IMG_1576

Close Up of the Mushroom Cup Cake with Catapillar

Woodland Birthday Party Theme Collage 2

The Birthday girl (in her splendiferous gnome outfit) spent a good part of the party blowing bubbles in the yard.

Madeleine Blowing Bubles

With the help of her “Gunkle James”.

James Blowing Bubbles at the Birthday Party

She took some time out from bubble blowing to smash an entire birthday cake into her mouth.

(Bet she poops red food coloring for a week)

The Birthday Girl Discovers Cake for the First Time

The Birthday Girl with Her Mommy Pausing for some Fluids

The drink of the day was “Swamp Punch” served in mason jars with the perfect straw-sized hole punched in the lid.

Swamp Punch Collage

Jamie and the Swamp Punch

The Birthday Girl and her Girl Friends

Ivan Has His Favorite Flavor

Sweet, Sweet Lili

Here’s that happy gnome family,

The Gnome Family Poses for a Picture

…and a few of their friends,

Jamie and Teagan Gnome Collage

Gus Lili and James Gnome Collage

Ivan and Gert Gnome Collage

At the end of the afternoon, everyone went home with home-made s’mores…..

S'Mores Thank You Gifts

Perfect ending to a perfect day,

Happy First Birthday Madeleine……

Share this:

  • Share on Facebook (Opens in new window) Facebook
  • Share on LinkedIn (Opens in new window) LinkedIn
  • Share on X (Opens in new window) X
  • Share on Pinterest (Opens in new window) Pinterest
Like Loading...

It’s a Crewel Crewel World

Posted by James on April 4, 2014
Posted in: New Home. Tagged: Crewel Indian Chief, Crewel Work Indian Chief. 26 Comments

The tag at the junk shop read……

“Amaze-Balls Crewel Work Indian Chief”

and just how could I be expected to possibly resist that?

……. so, after a little internal debate (yes, I’m pretty cheap) I brought him home with me.

Crewel Work Indian Chief

He’s from a kit.

1975-ish, I Googled him and found an expired Ebay listing. That Faux Bois background should have been a clue to the 1970’s.

These kinds of craft was pretty popular then, but I’ve never seen an Indian before. W-to the-OW

Just look at the detail.

Crewel Work Indian Chief Close-Up on Face

I would imagine that some woman spent uncounted hours working on him. Probably while watching McMillan and Wife on the television that doubled as a piece of furniture.

Crewel Work Indian Chief on It's Side

On the backside you can see all the knotting that went into him.

Crewel Work Indian Chief from Behind

Crewel Work Indian Chief Knots

He needs to be restretched.

Which shouldn’t be much of a problem because he’s held together with loose staples and thumbtacks.

Thumb Tacks Holding Together the Crewel Work Indian Chief

I popped the thumb tacks out and pulled the guy a little tighter…

Then I used some scrap cedar in the garage to make a quick frame for him. Basicly I made 2 frames with the brad gun, same outside width – one slightly smaller, and glued them together with wood glue. I filled in the holes with natural colored putty, and gave the whole thing a light sanding.

Cedar Frame for the Crewel Indian Collage

Finished Cedar Frame for the Crewel Indian Head

I used some flat straps at an angle to hold him in the frame.

Someday, I may have him framed by a professional, but I like the simplicity of the free cedar frame for now.

I Used Flat Straps at An Angle to Attach Picture to frame

He works just perfectly in the guest room.

1970's Crewel Work Indian Chief in Cedar Frame

Crewel Work Indian Chief Over Guest Bed

Still need to frame that big cow head……

Guest Room with Crewel Work Indian Chief Over the bed

If there were a fire in the Cavender house, that Indian would be the first thing that I would save.

After Harley, of course….Oooooh and Jamie…

Then the Indian.

Yepp, Indian third.

Share this:

  • Share on Facebook (Opens in new window) Facebook
  • Share on LinkedIn (Opens in new window) LinkedIn
  • Share on X (Opens in new window) X
  • Share on Pinterest (Opens in new window) Pinterest
Like Loading...

East Village Penthouse with Patina

Posted by James on March 30, 2014
Posted in: New Home. Tagged: Architectural Digest, East Village Penthouse, Goldfarb Paredes Apartment. 10 Comments

This photo shoot is from Architectural Digest 2 years ago, but my dear friend Mary Jo said that she missed it, and this is one of my absolute favorite spaces….so thought I’d share with all of y’all.

Architectural Digest April 2012

Who lives here? Writer Brad Goldfarb, who’s cooking blog I just devour – the Recipe Grinder, and his partner, Alfredo Paredes—Executive Vice President at Ralph Lauren.

2 talented guys, one timeless apartment.

“This place is amazing,” Alfredo whispered to Brad on the first viewing. After about a year of looking at listings all over downtown Manhattan, the boys had finally found their place.

The building had been a hospital in the 1920’s, and a music school after that. At some point in its hardworking life, the top 3 floors had been converted into apartments. It wasn’t difficult at all for the pair to imagine living there. A 2,500 square-foot penthouse, abundant natural light, extremely high ceilings and, of course, that terrace with the direct view of a historic East Village church…….what’s not to love? But the space needed work to remove the awful “80’s-ness” and convert it into something a little more timeless. Alfredo imagined it as an artist’s garret.  Something that evoked the all the romance of early California architecture. Natural white oak was used – for paneling, built-in bookcases, and cabinetry – raw plaster for the walls, reclaimed wood for the ceilings, and French limestone tiles for the flooring. These elements gave the place an instant patina.

A History

Art Wall Above Staircase in Goldfarb/Paredes East Village Penthouse

Living Room and Fireplace in Goldfarb/Paredes East Village Penthouse

Living Room Sofa in Goldfarb/Paredes East Village Penthouse

Console Table in Goldfarb/Paredes East Village Penthouse

Dining Table with Vintage Pendant in Goldfarb/Paredes East Village Penthouse

Kitchen in Goldfarb/Paredes East Village Penthouse

Guest Room/Office in Goldfarb/Paredes East Village Penthouse

Master Bedroom in Goldfarb/Paredes East Village Penthouse

Master Bathroom in Goldfarb/Paredes East Village Penthouse

5 sets of double doors lead to the best feature of the whole penthouse……the terrace.

Patio Dining at Goldfarb/Paredes East Village Penthouse

View from the Patio at Goldfarb/Paredes East Village Penthouse

Seating on Patio at Goldfarb/Paredes East Village Penthouse

(All Photography by Miguel Flores-Vianna for AD)

What did I tell y’all?

Looks like it has a history…..

Share this:

  • Share on Facebook (Opens in new window) Facebook
  • Share on LinkedIn (Opens in new window) LinkedIn
  • Share on X (Opens in new window) X
  • Share on Pinterest (Opens in new window) Pinterest
Like Loading...

“I Can’t Live in a Cage, Man”

Posted by James on March 27, 2014
Posted in: New Home. Tagged: Factory Pendant Cages, Global Industrial Cages, Hanging Barn Lights. 15 Comments

Remember those factory pendants that I hung in the garage last summer?

Of course y’all do.

These babies….

Close Up of New Pendant

A couple of gift-cards and a miss-priced floor display later, we brought 4 home for an absolute steal.

Well, anyhoo, we’d always meant to cage them, like in a factory, but didn’t want to spend the crazy money it seems to cost just for cages. More than twice as much as the pendants cost us in the first place.

Enter Jonathan, a reader of ours, who sent us 3 different sources for cages online…and ALL 3 extremely well priced.

How could we not do them now?

I ordered 4 16 inch cages from Global Industrial, and we had them in our hot little hands 4 days later.

Wire Pendant Cages from GlobalIndustrial.com

I grabbed a few bolts with wing nuts to attach them.

Bolt with Wing Nut to Attach Wire Cages

They simply “pinch” together over the rim of the light fixture. It might be a little easier with 3 hands…..but I got them done.

The Cages Simply Slip Over the Pendants

I had thought that we might spray them red – and still may someday – until then, I just hung the plain galvanized.

For some reason, they look black in the pictures.

Factory Pendant in the Garage with Wire Safety Cage

To change the bulb, if it ever burns out, we just reach up through the hole in the center.

Clever, Right?

Looking Straight up at the Factory Pendant with Safety Cage

No real safety reason for these….

Just like the aesthetics…

Am I right? I usually am…..

Share this:

  • Share on Facebook (Opens in new window) Facebook
  • Share on LinkedIn (Opens in new window) LinkedIn
  • Share on X (Opens in new window) X
  • Share on Pinterest (Opens in new window) Pinterest
Like Loading...

The Magnificent Millicent Rogers

Posted by James on March 24, 2014
Posted in: Did Ya Know?, New Home. Tagged: Millicent Rogers, Millicent Rogers Museum, New Mexico, Southwest Jewelery, Taos, Taos New Mexico. 20 Comments

Millicent Rogers

Millicent Rogers was born in 1902 as the heiress to the Standard Oil fortune. After contracting rheumatic fever as a small child, doctors gave her only a few years to live. She proved them wrong, but suffered from poor health for her entire life; enduring several heart attacks, pneumonia, and even a crippled left arm.

No one ever called Millicent Rogers a “poor little rich girl” but she did have several eccentricities; like using a 24-karat gold toothpick at dinner parties, traveling with a pack of 7 to 10 dachshunds at a time, and a tremendous attachment to thousand-dollar Charles James couture blouses (she ordered them by the dozens). During gas rationing in World War II, she simply avoided this inconvenience by hiring a yellow cab and cabby full-time. When the cabby asked, “Where to, Lady?” She replied, “Just keep the meter running ’till the end of this damn war.”….and he did. She even had the cab painted black and the back seat upholstered in leopard print.

She was married 3 times, and had 3 sons, but Millicent Rogers was romantically linked to a number of notable men throughout her life, including author Roald Dahl, actor Clark Gable, author Ian Fleming, the Prince of Wales, Prince Serge Obolensky, and even an unknown “heir to the Italian throne”.

After her third divorce in 1947, Millicent planted herself in Taos, New Mexico declaring that it was, “time to stop falling in love.” She named her home, a reclaimed adobe fort, Turtle Walk and she filled it with Spanish Colonial furniture and native American textiles, pottery, jewelry, baskets, santos, tinwork and paintings. She loved the relaxed New Mexican lifestyle and traded in her usual couture dresses for a daily uniform of an authentic Navajo blouse, a long and full skirt propped up with multiple petticoats, a shawl and bare feet. In 1947, Rogers and several prominent friends hired lawyers and visited Washington, D.C. to promote the issue of Indian rights and citizenship. She even successfully lobbied for Native American art to be classified as historic, and therefore protected.

She died in 1953 as the result of an aneurysm. She was only 51.

Following her death, one of her estate lawyers was heard to remark, “What are we going to do with all this junk?”….refering to the thousands of Native American jewelry pieces that she had lovingly amassed in just a few years of living in New Mexico.

Her sons knew exactly what to do with it all. They founded the Millicent Rogers Museum in Taos, New Mexico.

Today it is widely considered to be the gem of the American Southwest.

Here is just a sampling from Millicent’s extensive collection.

Bow Guards in the Millicent Rogers Collection in Taos New Mexico

navajo2

Cuffs and Bracelets in the Millicent Rogers Collection in Taos New Mexico

navajo6

Turquoise Necklace from the Millicent Rogers Museum in Taos New Mexico

NMTM613

Bow Guards from the Millicent Rogers Collection in Taos New Mexico

navajo5

Rings from the Millicent Rogers Collection in Taos New mexico

(All Photos via The Millicent Rogers Museum)

Wanna see more of her collection? … and can’t make it to Taos any time soon.

Check out the book  Fine Indian Jewelry of the Southwest. You can buy one from Amazon here.

I did,

Fine Jewelery of the Southwest the Millicent Rogers Collection

It’s almost like seeing Millicent’s collection in person.

Share this:

  • Share on Facebook (Opens in new window) Facebook
  • Share on LinkedIn (Opens in new window) LinkedIn
  • Share on X (Opens in new window) X
  • Share on Pinterest (Opens in new window) Pinterest
Like Loading...

More Cushion for the………Banquette

Posted by James on March 22, 2014
Posted in: New Home, Projects. Tagged: American Foam Rubber, Banquette Cushion, foam cushion, House of Design Dallas. 25 Comments

When last we left off on our banquette project, y’all might remember that we built the sucker and had a cushion….but it was naked.

Acquiring that foam cushion was not an easy task. Silly me thought we could just grab one from a fabric store…AAAhhhh, no. Not quite that easy.

Our bench is 31 inches deep….the standard for foam is 24 inches. AND, it’s expensive.

I Googled, like everyone else does to solve problems, and found American Foam Rubber here in Dallas. 5 minutes away from the Cavender house to be exact.

Jamie ran this errand while I was working.

We wanted a thick, deep cushion, just like on a sofa, so Jamie choose a 4 inch thick foam.

Soft, Medium, and Hard Foams

Just like Goldilocks, he tried out the 3 densities on his behind; Soft, Medium, and Firm.

Medium density won out. Naturally, not too soft, not to firm.

Soft Foam for the Banguette Seat

Not only did American Foam Rubber stock foam that was large enough, 48 inches deep, they also cut it to our exact size.

Sure, we had to buy a whole sheet……but it was only 70 bucks. Trust me, that’s a bargain.

And 5 bucks more for the cut? No problem with that.

4 inch Foam Cushion on the New Banquette

Now to cover it.

After a grueling day of fabric shopping, we narrowed it down to 6 candidates – all pretty similar nubby fabrics; 3 khakis, and 3 blacks.

Possible Fabrics for the Cushion

The khakis just didn’t look right with the birch cabinets. So black moved up on the list.

We wanted a black that was just like our fireplace, not too black, not too grey.

We choose the first one in the pile…(also the cheapest, $14.00 a yard, but that’s just a coincidence) Really, I would have paid almost anything for the perfect fabric.

I can sew, but certainly not professionally, so I dragged our foam, and several yards of the black linen-like fabric, to Pam at House of Design. She’s been doing my seamstress work for 10 years now.

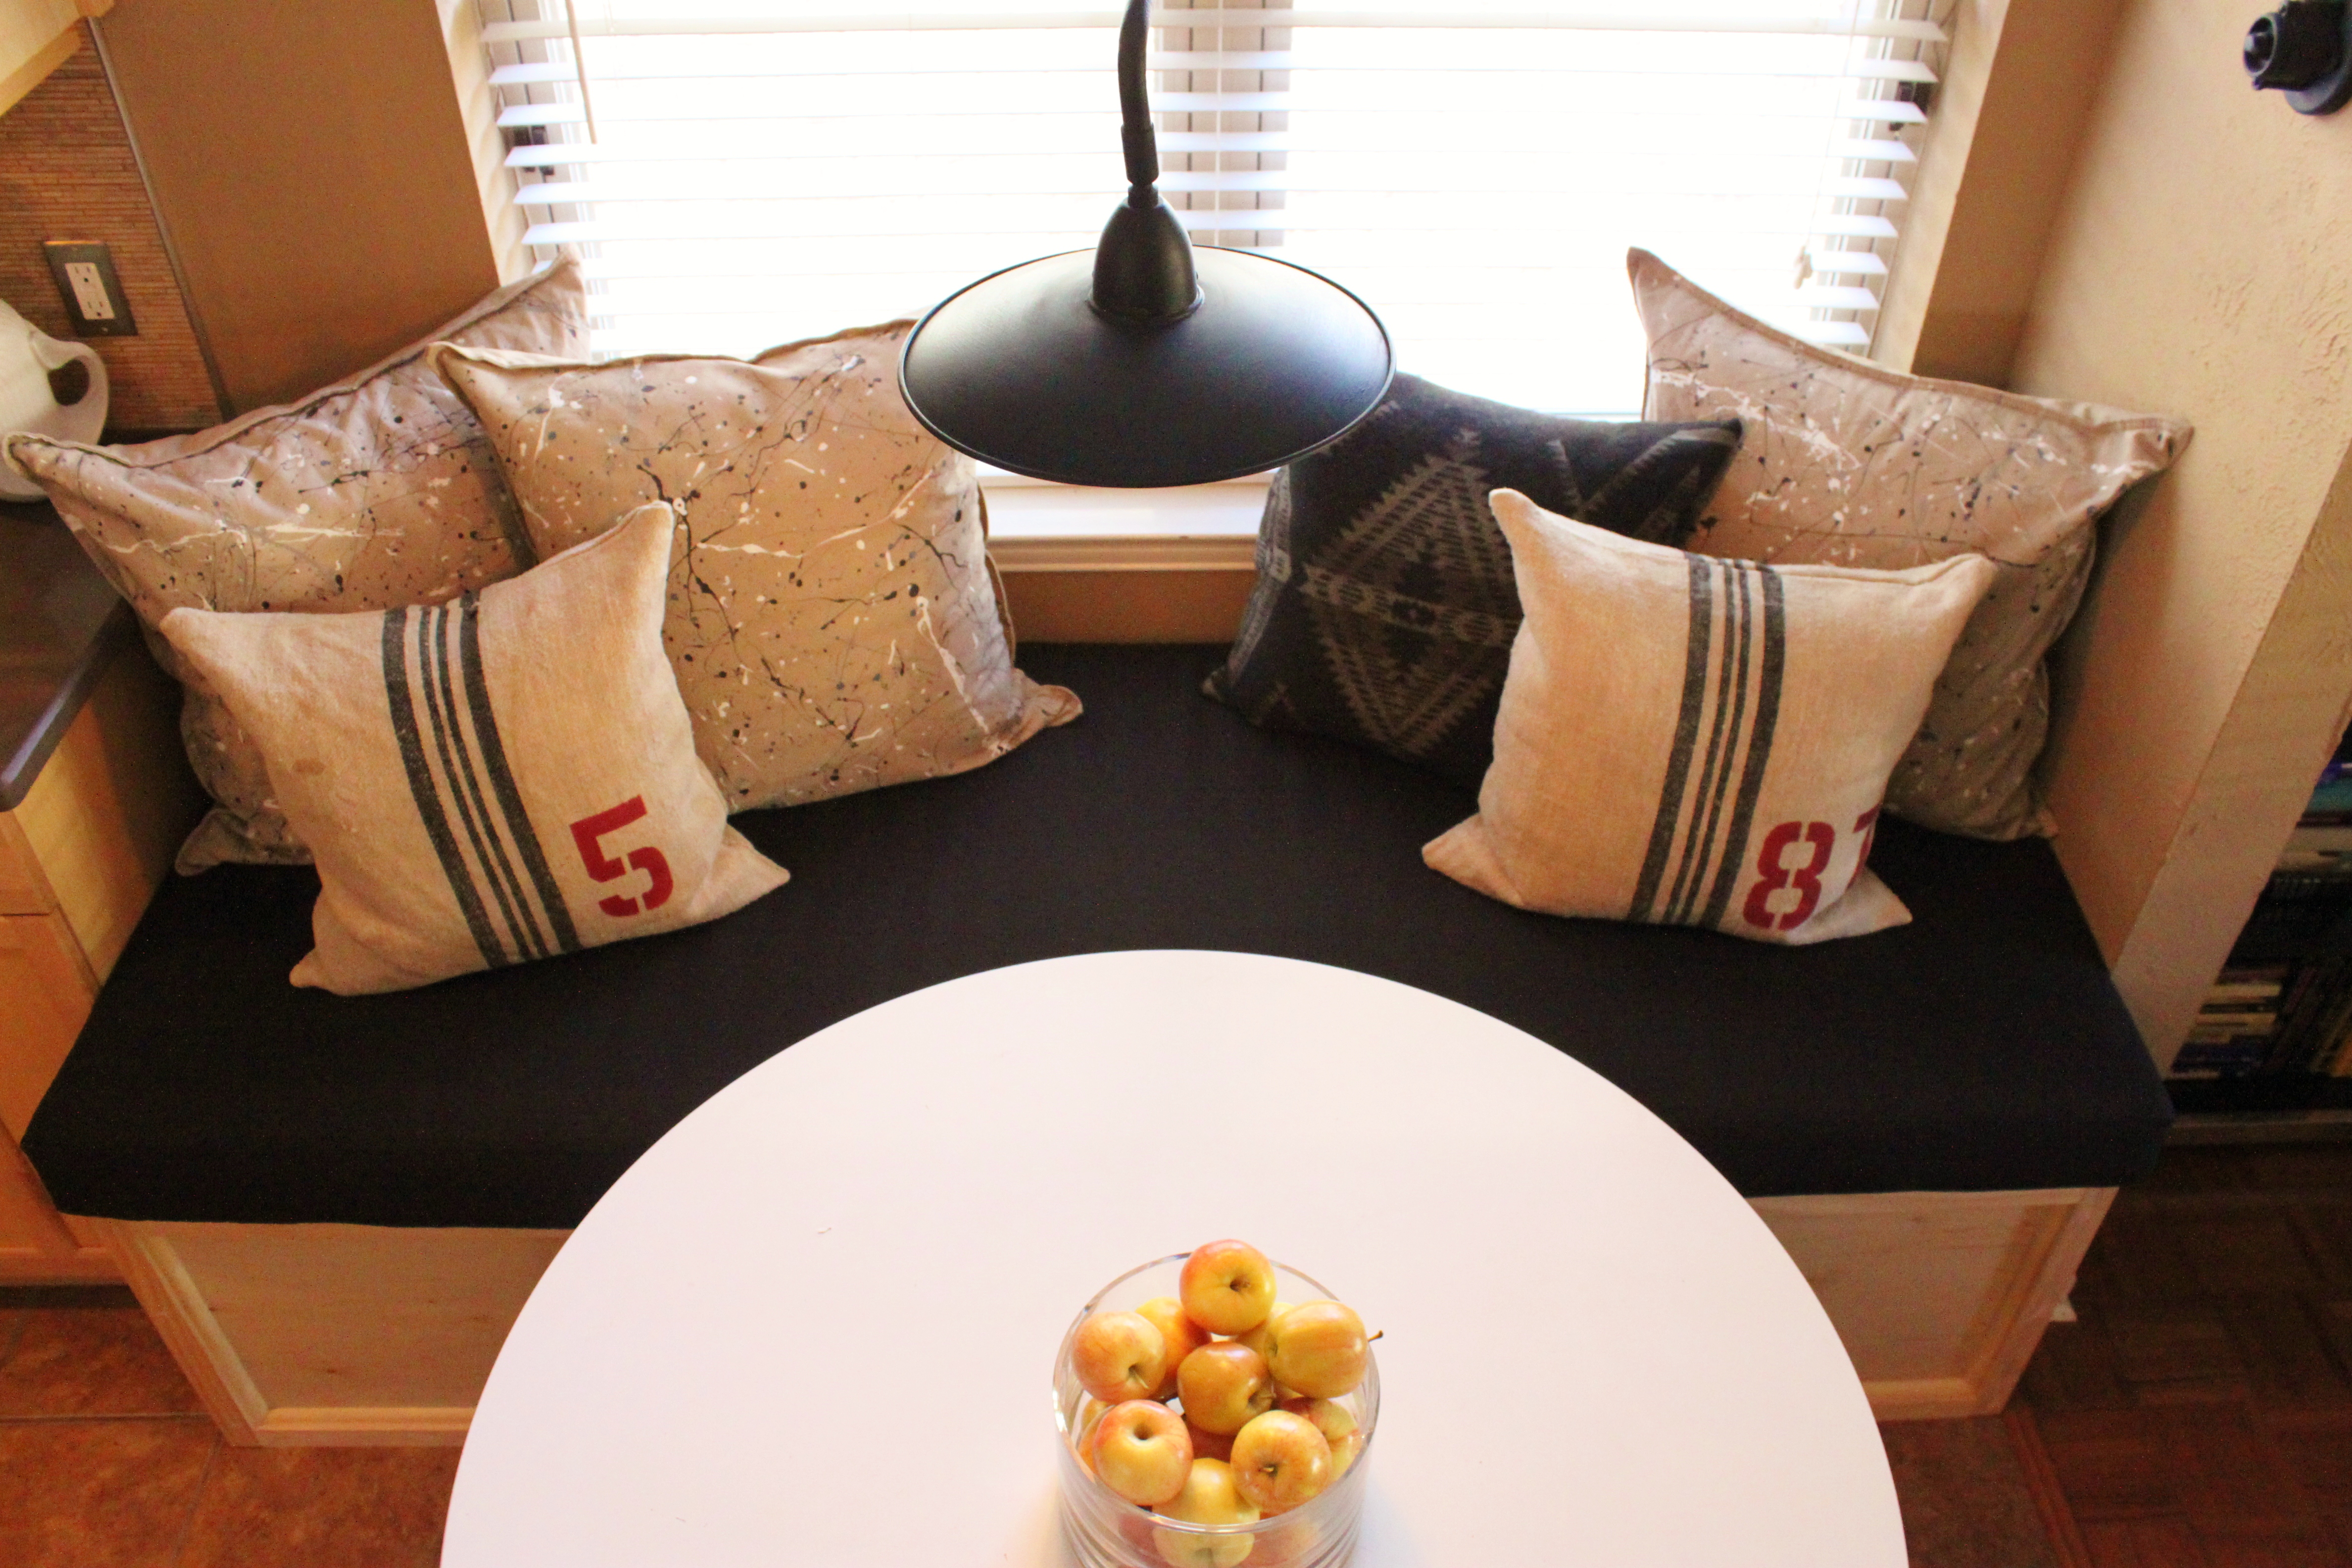
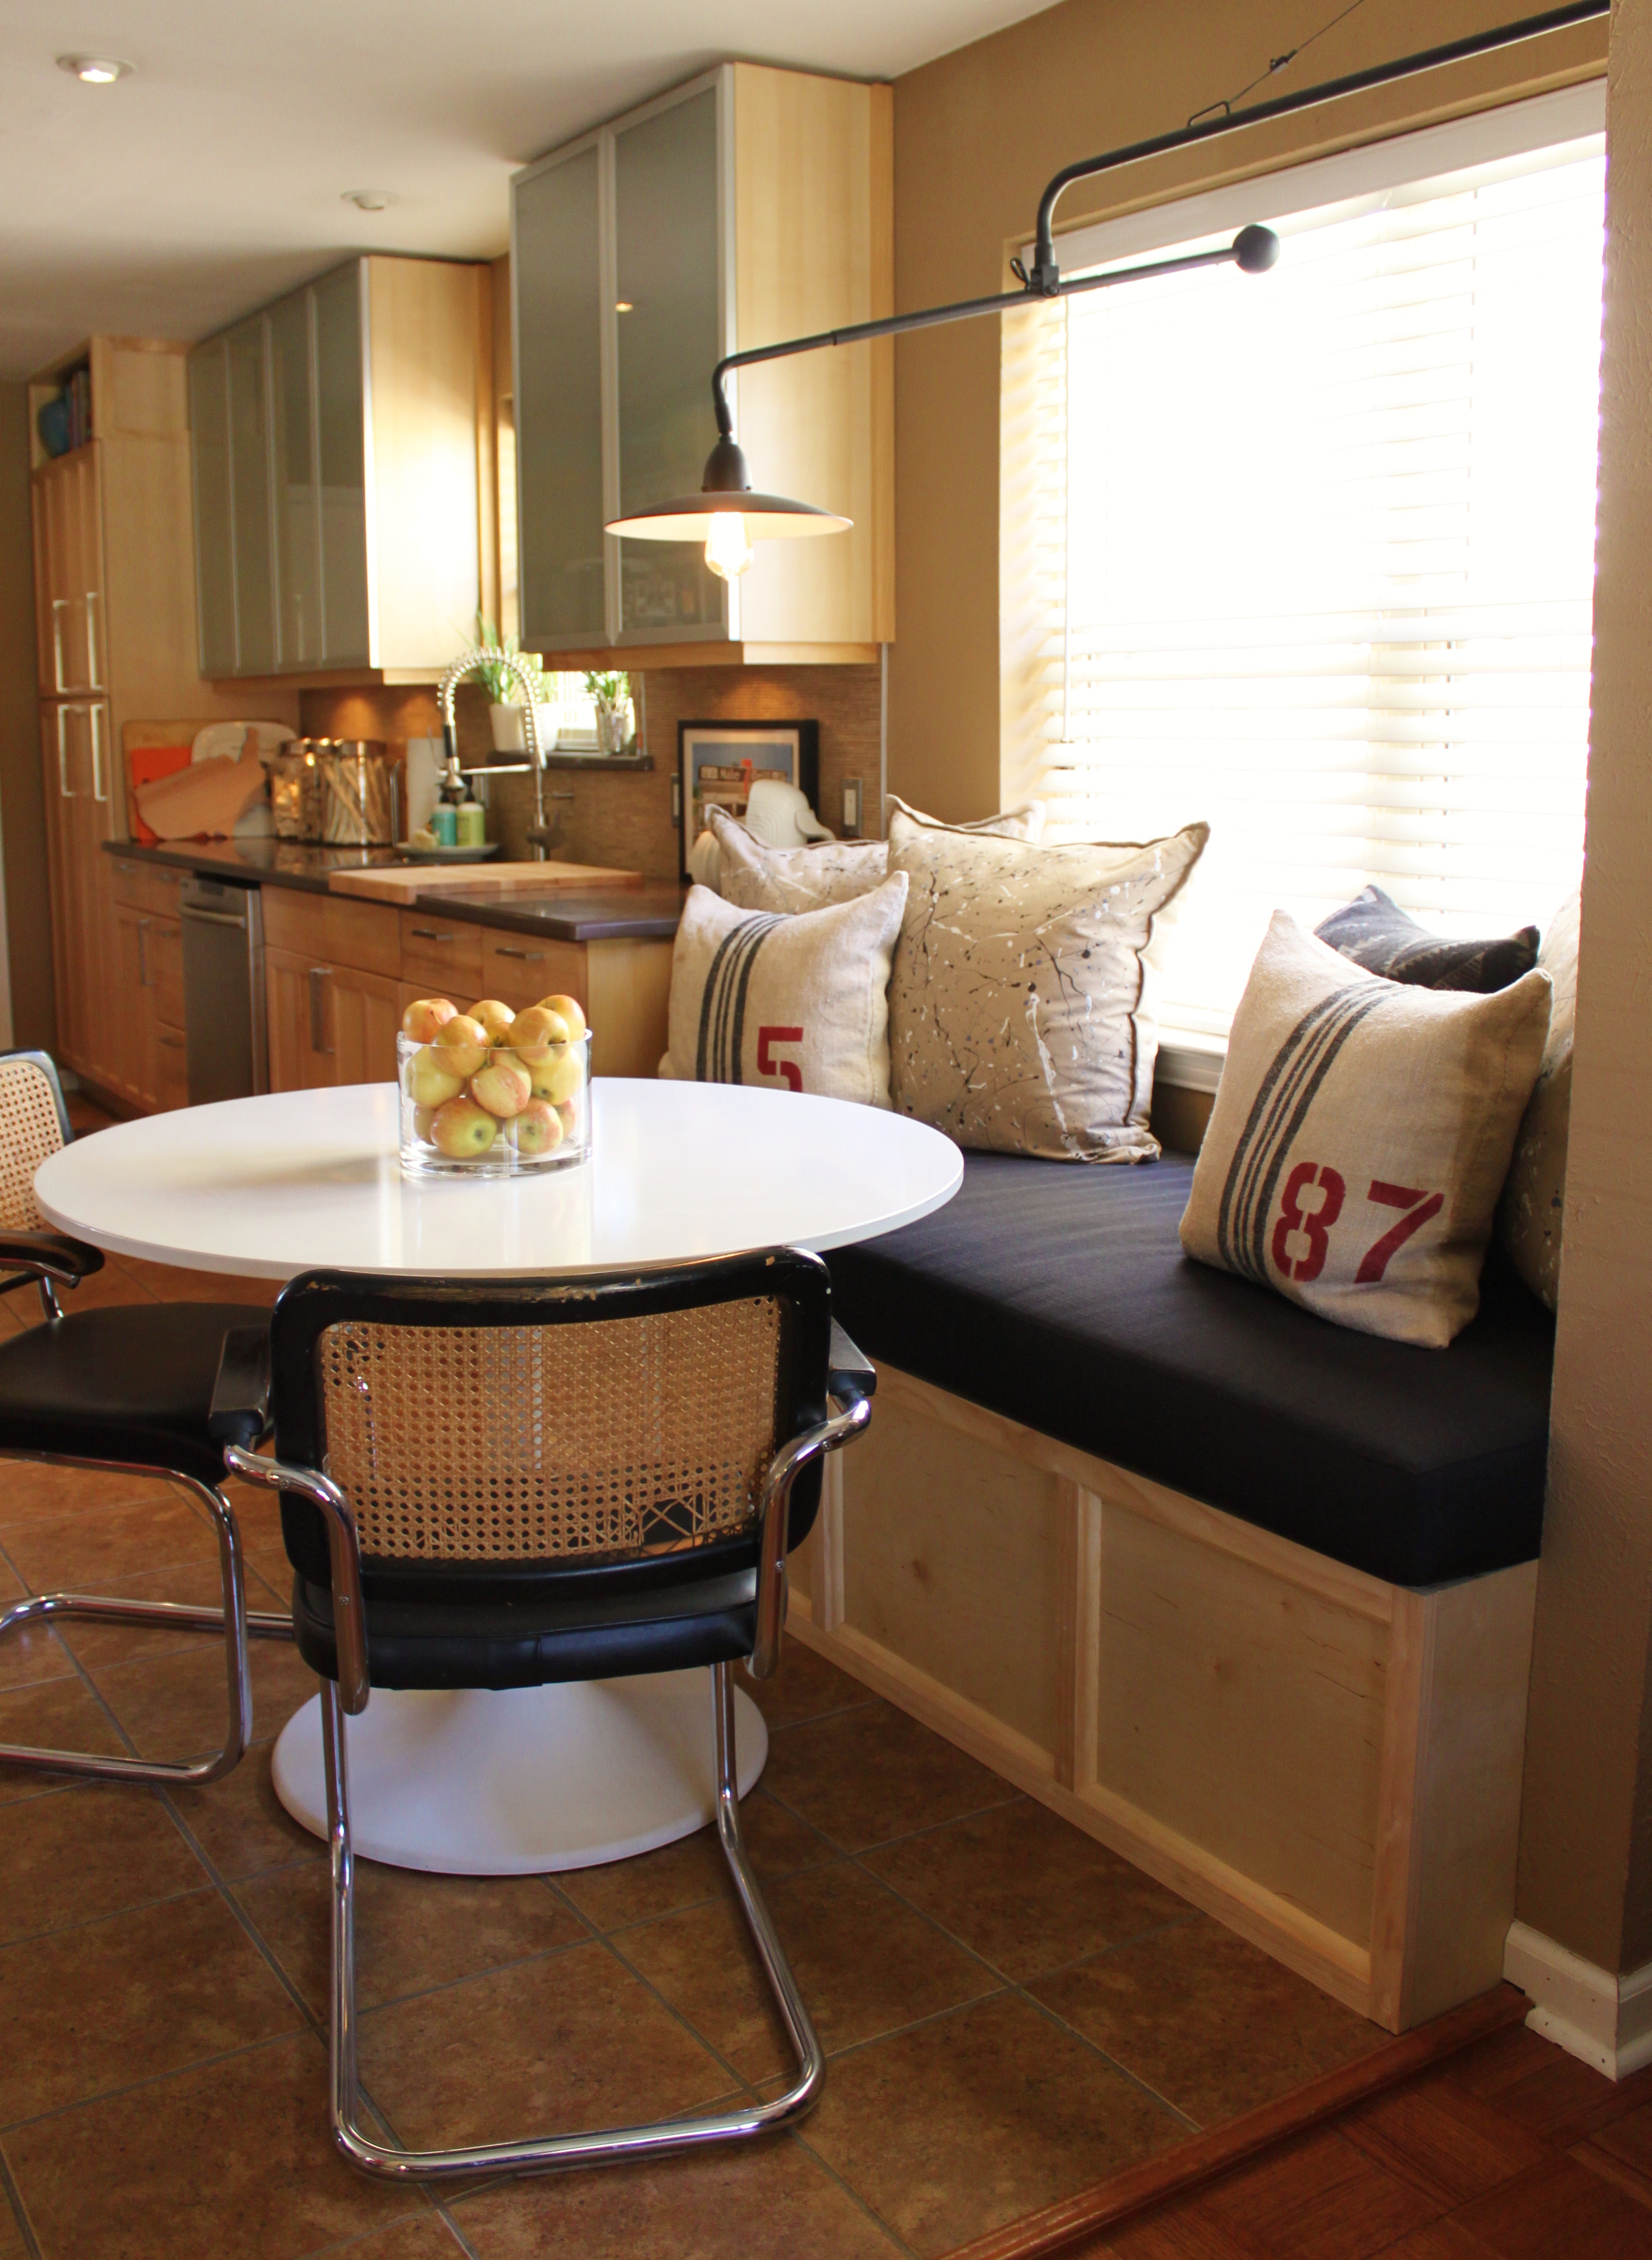
About 2 anxious weeks later we had this…..

Black Linen Cushion on the Banquette in the Kitchen

Looks even better with pillows, furniture, and a nice bowl of apples…….

Kitchen Table, Chairs, and the New Banquette

Looking Downn on the new Banquette in the Cavender Kitchen

Looks especially great with the pillows we splattered painted a couple of years ago, and those grain sack pillows we stenciled with red numbers.

Y’all know just how “Pillow Happy” I can be…….it takes an unbelievable amount of restraint to edit it down to just 6.

Splatter Paint Pillows and Stenciled Grain Sack Pillow on the New Banquette

The New Banquette Filled with Pillows

Bowl of Apples

Looks like it should have been there all this time.

Looking Sideways at the New Kitchen Banquette

It’s just amazing…..you can go ahead and say it.

Of course, we both want to sit on it when we eat dinner. (It faces the TV perfectly)

(Sidenote here: Those are our last 2 Cessa chairs that still have the cane backs and vinyl seats mostly intact. As y’all can see, they cane isn’t holding up that well either. Maybe we’ll do something about those in the near future. Also thinking that pendant looks a little bit…underscale. HHHmmm? It just never ends around this house.)

Share this:

  • Share on Facebook (Opens in new window) Facebook
  • Share on LinkedIn (Opens in new window) LinkedIn
  • Share on X (Opens in new window) X
  • Share on Pinterest (Opens in new window) Pinterest
Like Loading...

Southwestern Cobb Salad

Posted by James on March 19, 2014
Posted in: New Home, Recipes. Tagged: Chipotle Peppers, Southwestern Cobb Salad. 10 Comments

Quick salad here folks…

Ever tried chipotles?

Not the burito place, actual chipotle peppers.

Chipotles are simply smoked jalapenos. And that smoke makes a flavorful world of difference.

For the best southwestern ranch dressing, all you need is a couple chipotles (find them in a can in the Mexican section of the grocery store) and an 8 ounce bottle of ranch dressing.

Chipotle Chili Peppers and Ranch Dressing

Add the 2 peppers and the whole bottle of ranch dressing to a mini food processor, along with 2 teaspoons of the chipotle liquid, and hit pulse for just a second.

A Quick Pulse Makes Chipotle Ranch

That’s it.

Deliciousness in just 1 second.

Mix this with sour cream for a cool, smokey dip for veggies or taquitos, or toss a couple of spoonfuls with a bag of mixed greens……

Toss Greens With the Chipotle Ranch Dressing

….and layer on a plate.

To top this spicy salad we usually just use whatever we have in the fridge. Grilled chicken, cherry tomatoes, cheese, hard-boiled eggs, and bacon are pretty standard for a Cobb salad. Avocado, corn, and diced jicama (a Mexican root vegetable somewhere between a potato and an apple) give it a little more of a southwestern flavor.

Southwestern Cobb Salad Layers

Extremely simple salad,

…….and guaranteed delicious.

Beautiful and Delicious Southwestern Cob Salad

You’re welcome,

Share this:

  • Share on Facebook (Opens in new window) Facebook
  • Share on LinkedIn (Opens in new window) LinkedIn
  • Share on X (Opens in new window) X
  • Share on Pinterest (Opens in new window) Pinterest
Like Loading...

A Texas License Plate Becomes a Box

Posted by James on March 16, 2014
Posted in: New Home, Projects. Tagged: License Plate Box How To, license plates, Old License Plates. 49 Comments

What to do with all those old license plates just filling space in our garage..

It’s obvious that I’m not going to use them to cover the walls in our bathroom……….anymore.

Assorted Old License Plates I've Collected Over the Years

OK, bear with me here…….We saw boxes made from old license plates at a craft fair recently. As usual, I thought, “I can do that”.

OOOh yes, I can……just watch me.

I started with a “medium density” license plate from 1972. The older ones are way too thick………and newer ones are way too thin (and not a cool looking as the old ones either)

To copy my box, you will need:

All the Tools for Making a License Plate Box

  • A Rubber Mallet
  • Tin Snips
  • Pliers
  • Black Sharpie Marker
  • Block of Scrap Wood (About 5 1/2″ X 3 1/2″)
  • Tape Measure
  • Protective Gloves (I’m a “dare-devil” and didn’t wear any, but the cut edges can be very treacherous)
Start with a mallet and flatten the license plate as much as you can.

It doesn’t have to be perfect. Just slightly flatter.

Flatten the License Plate with a Rubber Mallet

On the backside of the plate draw a 3 1/4 inch line with a sharpie, line it up with the bottom of the TEXAS (or whatever state name is centered at the top of the plate)….about 1 1/2 inches down.

Draw a 3 1/4 inch Cut Line with a Sharpie

Use the tin snips to cut down the line.

Use Tin Snips to Cut the Lines

Then snip off about an inch from the edges.

Snip Off About 1 Inch

The cut license plate should look something like this.

License Plate with Cuts

Use the wood block to fold up the front edge of the license plate.

Use the Wood Block to Fold the Plate

Fold the Side Up

The rubber mallet will make the fold a little crisp-er.

Use a Mallet to Gte a Crisp Fold Line

Fold up the front and back.

The TEXAS should be legible.

The Edges Folded up on the License PLate Box

Use the pliers to bend in the back side. Again, try to get a crisp fold.

Use Pliers to Bend in the Sides

Then fold in the front as well.

Then Bend in the Other Sides Too

Bend the edge up over the sides…….and down into the box.

Pull the End Up Over the Sides

Repeat on the other side to make a box.

All the Edges Folded

Almost there now,

Use the 5 1/2″ wood block and rubber mallet to flatten out the whole box….as much as possible.

Us eht Wood Block and a Mallet to Square Off the Box

Use a Mallet and the Wood Block to Square the Edges of the Box

Taaa Daaaa!!!!

Finished Box Made From an Old License Plate

OK, I’ll admit it……. it still looks kinda …….rough,

But how perfect are these things for serving nuts on the patio?

Snack Boxes Made from Old License Plates

Beer and Nuts Out of Upcycled License Plates

Finished Snack Box Made from an Old License Plate

Pretty perfect, Am I right?

…Shame on you for doubting me.

Now go make a license plate box for yourself.

Share this:

  • Share on Facebook (Opens in new window) Facebook
  • Share on LinkedIn (Opens in new window) LinkedIn
  • Share on X (Opens in new window) X
  • Share on Pinterest (Opens in new window) Pinterest
Like Loading...

Posts navigation

← Older Entries
Newer Entries →
  • The Cavender Boys

  • Buy My Book

    Check out the link below to get your copy of "DIY Industrial Pipe Furniture & Decor" by James Angus

    https://amzn.com/1612436064

  • Tags

    American Flag Apartment Therapy arts Backyard Bathroom Remodeling Beacon Blanket Big Tex Black Spray Paint Bloggers Can Lights Cedar Walls Christmas Christmas Decorating Christmas Ornaments Christmas Tree Crazy Mouse Ride Den Diane Keaton diy Doberman Earth Grout Edward Curtis Electrical Work Fletcher's Corny Dogs flower beds Frankoma pottery Front Yard Garage Garage Update Halloween Halloween Decorating happy halloween harley Harley Davidson home House Tour Houzz hudson bay blankets Ikea Ikea Borrby Lantern illustration july 4th Key West Trip Kitchen Remodel Living Room mantle Master Bathroom Master Bathroom Remodel Master Bedroom mercury ornaments merry christmas Modern Horizontal Fence Motherhood Paint Colors plumbing pipe Projects Ralph Lauren restoration hardware Russet Stain Shiny Brite Ornaments state fair of texas style Swiss Army Blanket Target technology Texas State Fair thanksgiving Thrift store Tile Backsplash travel vacation Vintage chair vintage christmas vintage ornaments Wood Wall
  • Recent Posts

    • Vacation ’24
    • Happy Halloween
    • Planes, Trains & the Occasional Uber
    • Family Secrets
    • Capitol T, and that Rhymes with P
  • Archives

    • June 2024
    • October 2023
    • June 2023
    • April 2023
    • July 2022
    • December 2021
    • July 2021
    • December 2020
    • October 2020
    • September 2020
    • August 2020
    • July 2020
    • June 2020
    • May 2020
    • April 2020
    • March 2020
    • February 2020
    • January 2020
    • December 2019
    • October 2019
    • April 2019
    • January 2019
    • December 2018
    • November 2018
    • October 2018
    • September 2018
    • June 2018
    • May 2018
    • April 2018
    • March 2018
    • January 2018
    • December 2017
    • October 2017
    • September 2017
    • August 2017
    • July 2017
    • June 2017
    • May 2017
    • April 2017
    • March 2017
    • February 2017
    • January 2017
    • December 2016
    • November 2016
    • October 2016
    • September 2016
    • August 2016
    • July 2016
    • June 2016
    • May 2016
    • April 2016
    • March 2016
    • February 2016
    • January 2016
    • December 2015
    • November 2015
    • October 2015
    • September 2015
    • August 2015
    • July 2015
    • June 2015
    • May 2015
    • April 2015
    • March 2015
    • February 2015
    • January 2015
    • December 2014
    • November 2014
    • October 2014
    • September 2014
    • August 2014
    • July 2014
    • June 2014
    • May 2014
    • April 2014
    • March 2014
    • February 2014
    • January 2014
    • December 2013
    • November 2013
    • October 2013
    • September 2013
    • August 2013
    • July 2013
    • June 2013
    • May 2013
    • April 2013
    • March 2013
    • February 2013
    • January 2013
    • December 2012
    • November 2012
    • October 2012
    • September 2012
    • August 2012
    • July 2012
    • June 2012
    • May 2012
    • April 2012
    • March 2012
    • February 2012
    • January 2012
    • December 2011
    • November 2011
    • October 2011
    • September 2011
    • August 2011
    • July 2011
    • June 2011
    • May 2011
    • April 2011
    • March 2011
    • February 2011
    • January 2011
    • November 2010
    • August 2010
    • June 2010
    • May 2010
    • April 2010
    • March 2010
    • February 2010
  • Enter your email address to follow this blog and receive notifications of new posts by email.

    Join 2,158 other subscribers
  • @CavenderDiary

    Tweets by CavenderDiary
  • The Cavender Diary

    The Cavender Diary
  • The Cavender Diary

    • RSS - Posts
    • RSS - Comments
  • Blogs Worth Watchin'

    • An Urban Cottage
    • Apartment Therapy
    • Beard and Pigtails
    • Brooklyn Limestone
    • Burlap & Denim
    • Camp Wandawega
    • Color Outside the Lines
    • Decorpad
    • Decorum DIYer
    • Den & Delve
    • Design Hazards
    • Domestic Daddy
    • Domestic Imperfection
    • Eclectically Vintage
    • Emily Henderson
    • Fourth Floor Walkup
    • Funky Junk Interiors
    • Handmade America
    • Heather Bullard
    • Houzz
    • I Heart Organizing
    • Japanese Trash
    • kara pasley designs
    • Manhattan-Nest
    • Merrypad
    • Nine Red
    • Our Humble Abode
    • Our Vintage Home Love
    • Pure Style Home
    • Red Bird Vintage Home
    • Roger & Chris
    • Sweetsuite
    • Tara Bradford Photography
    • The Brick House
    • The Inspired Room
    • The Lettered Cottage
    • The Recipe Grinder
    • Today's Nest
    • Vintage Revivals
    • West Eastern
    • Yellow Brick Home
    • Young House Love
  • Steal Our Style

    • American Photo Archive
    • Art's Not Dead
    • Barn Light Electric
    • Bauer Pottery
    • CB2
    • Decades Home
    • Design Within Reach
    • El Paso Saddle Blankets
    • Fiestaware
    • Jonathan Adler
    • Just Modern Decor
    • Lucky Stars Ranch
    • Pendleton
    • Pottery Barn
    • Ralph Lauren Home
    • Ranger Doug
    • Restoration Hardware
    • School House Electric & Supply Co.
    • Sonic Editions
    • The Curiosity Shoppe
    • The Land of Nod
    • Urban Outfitters
    • West Elm
    • Wisteria
Blog at WordPress.com.
THE CAVENDER DIARY
Blog at WordPress.com.
  • Subscribe Subscribed
    • THE CAVENDER DIARY
    • Join 1,063 other subscribers
    • Already have a WordPress.com account? Log in now.
    • THE CAVENDER DIARY
    • Subscribe Subscribed
    • Sign up
    • Log in
    • Report this content
    • View site in Reader
    • Manage subscriptions
    • Collapse this bar
 

Loading Comments...
 

    %d